Tuning Wiki

This is a historical revision. Read the current page or return to its history.

Page organisation in this revision
Page type
Technical article
Subject
Diagnostics
Parent
Section level
Applies to
No ECU-specific applicability
Tool groups
None
Manufacturers
None

Changes from revision 1 to revision 11

Removed text is struck through; added text is highlighted.

The throttle position sensor (TPS) tells the engine control unit (ECU) where the throttle valve is positioned. An incorrect or interrupted signal can cause hesitation, unstable idle, a warning light or reduced power. A fault code identifies a circuit or plausibility problem to investigate; it does not prove the sensor itself is faulty.

Example electronic throttle body, showing the plate, motor housing and electrical interface. Figure 1 from Rui Bai and Shaocheng Tong, “Adaptive Backstepping Sliding-Mode Control of the Electronic Throttle System in Modern Automobiles” (2014), CC BY 3.0; cropped from the article page. Designs vary.

Common symptoms and first checks

What you noticeWhat to investigate Hesitation, flat spots or jerking when acceleratingRecord when it happens and inspect the throttle and pedal signals, connections and wiring. Air leaks, fuel delivery and ignition faults can cause similar symptoms. Unstable idle, stalling or unexpected idle speedCheck throttle movement and deposits, relevant fault codes, intake leaks and the manufacturer’s idle and adaptation procedure. Warning lamp or reduced-power modeRecord all codes and freeze-frame data. Check the specified sensor circuits, correlation and actuator operation before replacing parts. Poor response to the acceleratorCompare pedal position, commanded throttle and measured throttle where supported. Investigate the pedal, throttle actuator, power supplies and wiring as indicated. Fault appears after cleaning, battery work or replacementCheck connectors, correct part and installation; follow any vehicle-specific initialisation or throttle adaptation procedure.

Symptoms vary by engine and system; a signal can be faulty without causing every symptom. A HELLA Ford Focus example describes reduced power and plausible sensor, connector and throttle-body causes for specific vehicles.

Throttle sensor or accelerator pedal sensor?

On a cable-operated throttle, the accelerator moves the throttle through a mechanical linkage and the TPS reports throttle position. Some older systems use an idle/full-throttle switch rather than a continuously variable sensor. On an electronic throttle, the accelerator pedal position sensor (APP) reports driver demand; the ECU controls a motorised throttle and reads throttle position feedback. Pedal demand and throttle angle are related, but they are not necessarily equal: the ECU may alter throttle opening for idle, traction control, emissions or protection.

Many electronic systems have multiple sensor tracks or channels for plausibility checking. Their directions, scaling, voltage ranges and expected relationships depend on the vehicle; two traces do not always run in opposite directions. Some throttle position sensors are integrated into the throttle body, while others are serviceable separately. Check the exact vehicle information and available parts.
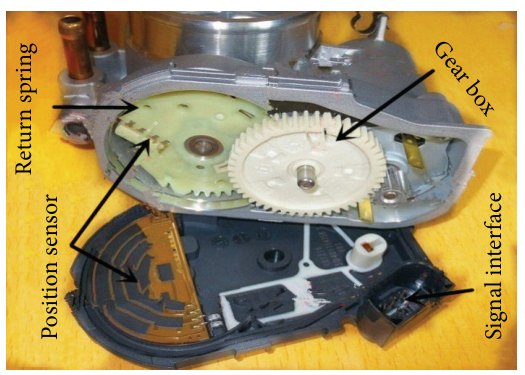
Opened example showing gears, return spring and position-sensor tracks in the cover. Figure 2 from Rui Bai and Shaocheng Tong, “Adaptive Backstepping Sliding-Mode Control of the Electronic Throttle System in Modern Automobiles” (2014), CC BY 3.0; cropped from the article page. Sensor technology and construction differ. This picture is for identification, not a recommendation to dismantle a unit.

What commonly goes wrong

Worn sensor track or internal failure: an intermittent dropout can occur at a particular throttle angle; non-contact sensor designs fail differently. Wiring or connector faults: damaged insulation, corrosion, loose terminals, oil or water ingress, a poor ground, or a short/open circuit can distort feedback. Reference supply: a shared reference or ground fault may affect several sensors at once. Use the wiring diagram to identify shared circuits. Throttle body or actuator: deposits, mechanical binding, a motor or drive fault, or air leaks can cause an actual position to differ from the ECU’s request. Pedal circuit: an APP signal or wiring problem may cause reduced response even if throttle-position feedback is sound. Incorrect fitting or adaptation: an incorrect part, connector problem, disturbed gasket, or incomplete required initialisation can cause trouble after repair.

Fault codes: start with the complete definition

P0120–P0124 commonly refer to throttle/pedal position sensor or switch A circuit faults; P0220–P0224 commonly concern circuit B. P2135 can indicate a throttle/pedal position sensor or switch A/B voltage correlation issue. P2101, P2119 and P2176 are examples of throttle actuator or learned-position codes. Definitions and diagnostic conditions vary by manufacturer: identify whether the affected circuit is at the throttle body or pedal and use the manufacturer’s fault tree. See the HELLA OBD code list.

Practical diagnostic sequence

Record the complaint. Note idle, acceleration, heat, vibration and recent work. Save all codes and freeze-frame data, including other reference-voltage, pedal, throttle actuator or airflow faults. Check the basics. Confirm battery condition and relevant power and earth connections. Examine the intake duct, throttle connector and wiring for damage, loose pins, moisture and contamination. Identify the system. Obtain the correct wiring diagram, sensor type, circuit identification, specifications and test conditions. Identify whether a sensor, switch, throttle body or pedal assembly is actually implicated. Review live data. With the manufacturer’s safe procedure, observe both APP channels and throttle feedback channels as applicable, plus desired and actual throttle position. Look for implausible changes or disagreement, but remember scan-tool values may be filtered, scaled or updated too slowly to show a brief dropout. Measure the circuits. Check specified sensor supply and ground under the stated conditions. A healthy reference at the ECU may not prove it reaches the sensor. Use approved back-probes and avoid spreading terminals or shorting adjacent pins. Capture the signal. Use a scope or suitable meter to monitor the specified signal and, where appropriate, both channels together through the range permitted by the manufacturer. A potentiometer’s signal should change smoothly as its position changes; sudden dropouts or spikes merit investigation. Compare actual voltages and channel relationships with the correct vehicle data, not a universal number. Separate sensor from wiring and actuator faults. Compare signal at the sensor and ECU when indicated; inspect the harness under the conditions that reproduce the complaint. If feedback accurately follows the plate but the plate does not reach its request, inspect the actuator, supply and mechanics using the prescribed tests. Repair, initialise and verify. Repair the confirmed fault, perform specified adaptation if required, then repeat the original operating conditions. Recheck codes and live data; perform a road test only when the vehicle is safe to drive.

Pico’s throttle potentiometer test explains waveform testing, while its accelerator pedal test covers a separate pedal circuit. Follow the vehicle manufacturer’s instructions if they differ.

Reading the signal without guessing

For a conventional potentiometer, the output changes with throttle angle and a scope can reveal an intermittent worn section that a slow scan-tool display misses. Some designs use contactless sensors or switched signals; an older idle/full-throttle switch will not produce the same gradual sweep. Identify the sensor before choosing a test. A steady reading alone does not prove the plate is moving correctly, and a fault in a shared supply can make a good sensor report an incorrect value.

Compare both feedback channels against the manufacturer’s specified range and relationship at the same operating point. Do not assume that the pedal and throttle percentages should match, or that every channel must start at zero or finish at 100%. Compare requested and actual plate position only using the specified test conditions; the ECU can intentionally limit movement.

Electronic throttle example with a schematic of the motor, gearing, spring and position sensor. Figure 1 from Acho, Pujol-Vázquez and Gibergans-Báguena, “A Recent Electronic Control Circuit to a Throttle Device” (2020), CC BY 4.0; unmodified. Other designs differ.

Safe cleaning, replacement and final checks

An electronic throttle can move unexpectedly when powered. Keep fingers and tools clear of the plate; switch off and isolate the system as the manufacturer specifies before inspection or cleaning. Do not force a motorised plate, energise the actuator directly or spray cleaner into electronics unless the vehicle procedure explicitly permits it. Use the specified cleaner and method, and replace seals where required.

Fit the correct sensor or complete throttle assembly as specified. Some vehicles require an idle or throttle position relearn after cleaning, replacement or power interruption; others have different procedures. Clear codes at the appropriate stage, repeat the test, check for intake leaks and verify idle and response. A returning code requires a fresh diagnosis rather than repeated calibration.

Related diagnostic guides

AdBlue and SCR system faults — fluid supply, dosing and SCR efficiency checks.NOx sensor faults — NOx measurement, wiring and SCR checks.DPF differential pressure sensor faults — pressure hoses, sensor readings and filter restriction.Exhaust gas temperature sensor faults — exhaust temperature, wiring and regeneration checks.Intake air temperature sensor faults — air temperature, wiring and heat-soak checks.Knock sensor faults — knock sensing, wiring and combustion checks.Accelerator pedal position sensor faults — pedal input and acceleration response checks.Camshaft position sensor faultsCrankshaft position sensor faultsCoolant temperature sensor faultsOxygen sensor faultsMAP sensor faultsMAF sensor faultsFuel pressure sensor faultsFuel pump faultsInjector faultsDPF faultsEGR faultsTurbo diagnosticsBoost leaksCamshaft position sensor faultsCrankshaft position sensor faultsCoolant temperature sensor faultsOxygen sensor faultsMAP sensor faultsMAF sensor faultsFuel pressure sensor faultsFuel pump faultsInjector faultsDPF faultsEGR faultsTurbo diagnosticsBoost leaks

For further system background see electronic throttle control and throttle body.

Rendered revisions

Open each version to inspect formatting, tables and photographs.

Revision 1: Common throttle position sensor faults: symptoms, checks and diagnosis

The throttle position sensor (TPS) tells the engine control unit (ECU) where the throttle valve is positioned. An incorrect or interrupted signal can cause hesitation, unstable idle, a warning light or reduced power. A fault code identifies a circuit or plausibility problem to investigate; it does not prove the sensor itself is faulty.

Electronic throttle body with valve plate, motor housing and electrical connector
Example electronic throttle body, showing the plate, motor housing and electrical interface. Figure 1 from Rui Bai and Shaocheng Tong, “Adaptive Backstepping Sliding-Mode Control of the Electronic Throttle System in Modern Automobiles” (2014), CC BY 3.0; cropped from the article page. Designs vary.

Common symptoms and first checks

What you noticeWhat to investigate
Hesitation, flat spots or jerking when acceleratingRecord when it happens and inspect the throttle and pedal signals, connections and wiring. Air leaks, fuel delivery and ignition faults can cause similar symptoms.
Unstable idle, stalling or unexpected idle speedCheck throttle movement and deposits, relevant fault codes, intake leaks and the manufacturer’s idle and adaptation procedure.
Warning lamp or reduced-power modeRecord all codes and freeze-frame data. Check the specified sensor circuits, correlation and actuator operation before replacing parts.
Poor response to the acceleratorCompare pedal position, commanded throttle and measured throttle where supported. Investigate the pedal, throttle actuator, power supplies and wiring as indicated.
Fault appears after cleaning, battery work or replacementCheck connectors, correct part and installation; follow any vehicle-specific initialisation or throttle adaptation procedure.

Symptoms vary by engine and system; a signal can be faulty without causing every symptom. A HELLA Ford Focus example describes reduced power and plausible sensor, connector and throttle-body causes for specific vehicles.

Throttle sensor or accelerator pedal sensor?

On a cable-operated throttle, the accelerator moves the throttle through a mechanical linkage and the TPS reports throttle position. Some older systems use an idle/full-throttle switch rather than a continuously variable sensor. On an electronic throttle, the accelerator pedal position sensor (APP) reports driver demand; the ECU controls a motorised throttle and reads throttle position feedback. Pedal demand and throttle angle are related, but they are not necessarily equal: the ECU may alter throttle opening for idle, traction control, emissions or protection.

Many electronic systems have multiple sensor tracks or channels for plausibility checking. Their directions, scaling, voltage ranges and expected relationships depend on the vehicle; two traces do not always run in opposite directions. Some throttle position sensors are integrated into the throttle body, while others are serviceable separately. Check the exact vehicle information and available parts.

Opened electronic throttle showing gears and position sensor tracks in the cover
Opened example showing gears, return spring and position-sensor tracks in the cover. Figure 2 from Rui Bai and Shaocheng Tong, “Adaptive Backstepping Sliding-Mode Control of the Electronic Throttle System in Modern Automobiles” (2014), CC BY 3.0; cropped from the article page. Sensor technology and construction differ. This picture is for identification, not a recommendation to dismantle a unit.

What commonly goes wrong

  • Worn sensor track or internal failure: an intermittent dropout can occur at a particular throttle angle; non-contact sensor designs fail differently.
  • Wiring or connector faults: damaged insulation, corrosion, loose terminals, oil or water ingress, a poor ground, or a short/open circuit can distort feedback.
  • Reference supply: a shared reference or ground fault may affect several sensors at once. Use the wiring diagram to identify shared circuits.
  • Throttle body or actuator: deposits, mechanical binding, a motor or drive fault, or air leaks can cause an actual position to differ from the ECU’s request.
  • Pedal circuit: an APP signal or wiring problem may cause reduced response even if throttle-position feedback is sound.
  • Incorrect fitting or adaptation: an incorrect part, connector problem, disturbed gasket, or incomplete required initialisation can cause trouble after repair.

Fault codes: start with the complete definition

P0120–P0124 commonly refer to throttle/pedal position sensor or switch A circuit faults; P0220–P0224 commonly concern circuit B. P2135 can indicate a throttle/pedal position sensor or switch A/B voltage correlation issue. P2101, P2119 and P2176 are examples of throttle actuator or learned-position codes. Definitions and diagnostic conditions vary by manufacturer: identify whether the affected circuit is at the throttle body or pedal and use the manufacturer’s fault tree. See the HELLA OBD code list.

Practical diagnostic sequence

  1. Record the complaint. Note idle, acceleration, heat, vibration and recent work. Save all codes and freeze-frame data, including other reference-voltage, pedal, throttle actuator or airflow faults.
  2. Check the basics. Confirm battery condition and relevant power and earth connections. Examine the intake duct, throttle connector and wiring for damage, loose pins, moisture and contamination.
  3. Identify the system. Obtain the correct wiring diagram, sensor type, circuit identification, specifications and test conditions. Identify whether a sensor, switch, throttle body or pedal assembly is actually implicated.
  4. Review live data. With the manufacturer’s safe procedure, observe both APP channels and throttle feedback channels as applicable, plus desired and actual throttle position. Look for implausible changes or disagreement, but remember scan-tool values may be filtered, scaled or updated too slowly to show a brief dropout.
  5. Measure the circuits. Check specified sensor supply and ground under the stated conditions. A healthy reference at the ECU may not prove it reaches the sensor. Use approved back-probes and avoid spreading terminals or shorting adjacent pins.
  6. Capture the signal. Use a scope or suitable meter to monitor the specified signal and, where appropriate, both channels together through the range permitted by the manufacturer. A potentiometer’s signal should change smoothly as its position changes; sudden dropouts or spikes merit investigation. Compare actual voltages and channel relationships with the correct vehicle data, not a universal number.
  7. Separate sensor from wiring and actuator faults. Compare signal at the sensor and ECU when indicated; inspect the harness under the conditions that reproduce the complaint. If feedback accurately follows the plate but the plate does not reach its request, inspect the actuator, supply and mechanics using the prescribed tests.
  8. Repair, initialise and verify. Repair the confirmed fault, perform specified adaptation if required, then repeat the original operating conditions. Recheck codes and live data; perform a road test only when the vehicle is safe to drive.

Pico’s throttle potentiometer test explains waveform testing, while its accelerator pedal test covers a separate pedal circuit. Follow the vehicle manufacturer’s instructions if they differ.

Reading the signal without guessing

For a conventional potentiometer, the output changes with throttle angle and a scope can reveal an intermittent worn section that a slow scan-tool display misses. Some designs use contactless sensors or switched signals; an older idle/full-throttle switch will not produce the same gradual sweep. Identify the sensor before choosing a test. A steady reading alone does not prove the plate is moving correctly, and a fault in a shared supply can make a good sensor report an incorrect value.

Compare both feedback channels against the manufacturer’s specified range and relationship at the same operating point. Do not assume that the pedal and throttle percentages should match, or that every channel must start at zero or finish at 100%. Compare requested and actual plate position only using the specified test conditions; the ECU can intentionally limit movement.

Electronic throttle body photograph and schematic showing motor, gearing, return spring and position sensor
Electronic throttle example with a schematic of the motor, gearing, spring and position sensor. Figure 1 from Acho, Pujol-Vázquez and Gibergans-Báguena, “A Recent Electronic Control Circuit to a Throttle Device” (2020), CC BY 4.0; unmodified. Other designs differ.

Safe cleaning, replacement and final checks

An electronic throttle can move unexpectedly when powered. Keep fingers and tools clear of the plate; switch off and isolate the system as the manufacturer specifies before inspection or cleaning. Do not force a motorised plate, energise the actuator directly or spray cleaner into electronics unless the vehicle procedure explicitly permits it. Use the specified cleaner and method, and replace seals where required.

Fit the correct sensor or complete throttle assembly as specified. Some vehicles require an idle or throttle position relearn after cleaning, replacement or power interruption; others have different procedures. Clear codes at the appropriate stage, repeat the test, check for intake leaks and verify idle and response. A returning code requires a fresh diagnosis rather than repeated calibration.

Related diagnostic guides

For further system background see electronic throttle control and throttle body.

Revision 11: Common throttle position sensor faults: symptoms, checks and diagnosis

The throttle position sensor (TPS) tells the engine control unit (ECU) where the throttle valve is positioned. An incorrect or interrupted signal can cause hesitation, unstable idle, a warning light or reduced power. A fault code identifies a circuit or plausibility problem to investigate; it does not prove the sensor itself is faulty.

Electronic throttle body with valve plate, motor housing and electrical connector
Example electronic throttle body, showing the plate, motor housing and electrical interface. Figure 1 from Rui Bai and Shaocheng Tong, “Adaptive Backstepping Sliding-Mode Control of the Electronic Throttle System in Modern Automobiles” (2014), CC BY 3.0; cropped from the article page. Designs vary.

Common symptoms and first checks

What you noticeWhat to investigate
Hesitation, flat spots or jerking when acceleratingRecord when it happens and inspect the throttle and pedal signals, connections and wiring. Air leaks, fuel delivery and ignition faults can cause similar symptoms.
Unstable idle, stalling or unexpected idle speedCheck throttle movement and deposits, relevant fault codes, intake leaks and the manufacturer’s idle and adaptation procedure.
Warning lamp or reduced-power modeRecord all codes and freeze-frame data. Check the specified sensor circuits, correlation and actuator operation before replacing parts.
Poor response to the acceleratorCompare pedal position, commanded throttle and measured throttle where supported. Investigate the pedal, throttle actuator, power supplies and wiring as indicated.
Fault appears after cleaning, battery work or replacementCheck connectors, correct part and installation; follow any vehicle-specific initialisation or throttle adaptation procedure.

Symptoms vary by engine and system; a signal can be faulty without causing every symptom. A HELLA Ford Focus example describes reduced power and plausible sensor, connector and throttle-body causes for specific vehicles.

Throttle sensor or accelerator pedal sensor?

On a cable-operated throttle, the accelerator moves the throttle through a mechanical linkage and the TPS reports throttle position. Some older systems use an idle/full-throttle switch rather than a continuously variable sensor. On an electronic throttle, the accelerator pedal position sensor (APP) reports driver demand; the ECU controls a motorised throttle and reads throttle position feedback. Pedal demand and throttle angle are related, but they are not necessarily equal: the ECU may alter throttle opening for idle, traction control, emissions or protection.

Many electronic systems have multiple sensor tracks or channels for plausibility checking. Their directions, scaling, voltage ranges and expected relationships depend on the vehicle; two traces do not always run in opposite directions. Some throttle position sensors are integrated into the throttle body, while others are serviceable separately. Check the exact vehicle information and available parts.

Opened electronic throttle showing gears and position sensor tracks in the cover
Opened example showing gears, return spring and position-sensor tracks in the cover. Figure 2 from Rui Bai and Shaocheng Tong, “Adaptive Backstepping Sliding-Mode Control of the Electronic Throttle System in Modern Automobiles” (2014), CC BY 3.0; cropped from the article page. Sensor technology and construction differ. This picture is for identification, not a recommendation to dismantle a unit.

What commonly goes wrong

  • Worn sensor track or internal failure: an intermittent dropout can occur at a particular throttle angle; non-contact sensor designs fail differently.
  • Wiring or connector faults: damaged insulation, corrosion, loose terminals, oil or water ingress, a poor ground, or a short/open circuit can distort feedback.
  • Reference supply: a shared reference or ground fault may affect several sensors at once. Use the wiring diagram to identify shared circuits.
  • Throttle body or actuator: deposits, mechanical binding, a motor or drive fault, or air leaks can cause an actual position to differ from the ECU’s request.
  • Pedal circuit: an APP signal or wiring problem may cause reduced response even if throttle-position feedback is sound.
  • Incorrect fitting or adaptation: an incorrect part, connector problem, disturbed gasket, or incomplete required initialisation can cause trouble after repair.

Fault codes: start with the complete definition

P0120–P0124 commonly refer to throttle/pedal position sensor or switch A circuit faults; P0220–P0224 commonly concern circuit B. P2135 can indicate a throttle/pedal position sensor or switch A/B voltage correlation issue. P2101, P2119 and P2176 are examples of throttle actuator or learned-position codes. Definitions and diagnostic conditions vary by manufacturer: identify whether the affected circuit is at the throttle body or pedal and use the manufacturer’s fault tree. See the HELLA OBD code list.

Practical diagnostic sequence

  1. Record the complaint. Note idle, acceleration, heat, vibration and recent work. Save all codes and freeze-frame data, including other reference-voltage, pedal, throttle actuator or airflow faults.
  2. Check the basics. Confirm battery condition and relevant power and earth connections. Examine the intake duct, throttle connector and wiring for damage, loose pins, moisture and contamination.
  3. Identify the system. Obtain the correct wiring diagram, sensor type, circuit identification, specifications and test conditions. Identify whether a sensor, switch, throttle body or pedal assembly is actually implicated.
  4. Review live data. With the manufacturer’s safe procedure, observe both APP channels and throttle feedback channels as applicable, plus desired and actual throttle position. Look for implausible changes or disagreement, but remember scan-tool values may be filtered, scaled or updated too slowly to show a brief dropout.
  5. Measure the circuits. Check specified sensor supply and ground under the stated conditions. A healthy reference at the ECU may not prove it reaches the sensor. Use approved back-probes and avoid spreading terminals or shorting adjacent pins.
  6. Capture the signal. Use a scope or suitable meter to monitor the specified signal and, where appropriate, both channels together through the range permitted by the manufacturer. A potentiometer’s signal should change smoothly as its position changes; sudden dropouts or spikes merit investigation. Compare actual voltages and channel relationships with the correct vehicle data, not a universal number.
  7. Separate sensor from wiring and actuator faults. Compare signal at the sensor and ECU when indicated; inspect the harness under the conditions that reproduce the complaint. If feedback accurately follows the plate but the plate does not reach its request, inspect the actuator, supply and mechanics using the prescribed tests.
  8. Repair, initialise and verify. Repair the confirmed fault, perform specified adaptation if required, then repeat the original operating conditions. Recheck codes and live data; perform a road test only when the vehicle is safe to drive.

Pico’s throttle potentiometer test explains waveform testing, while its accelerator pedal test covers a separate pedal circuit. Follow the vehicle manufacturer’s instructions if they differ.

Reading the signal without guessing

For a conventional potentiometer, the output changes with throttle angle and a scope can reveal an intermittent worn section that a slow scan-tool display misses. Some designs use contactless sensors or switched signals; an older idle/full-throttle switch will not produce the same gradual sweep. Identify the sensor before choosing a test. A steady reading alone does not prove the plate is moving correctly, and a fault in a shared supply can make a good sensor report an incorrect value.

Compare both feedback channels against the manufacturer’s specified range and relationship at the same operating point. Do not assume that the pedal and throttle percentages should match, or that every channel must start at zero or finish at 100%. Compare requested and actual plate position only using the specified test conditions; the ECU can intentionally limit movement.

Electronic throttle body photograph and schematic showing motor, gearing, return spring and position sensor
Electronic throttle example with a schematic of the motor, gearing, spring and position sensor. Figure 1 from Acho, Pujol-Vázquez and Gibergans-Báguena, “A Recent Electronic Control Circuit to a Throttle Device” (2020), CC BY 4.0; unmodified. Other designs differ.

Safe cleaning, replacement and final checks

An electronic throttle can move unexpectedly when powered. Keep fingers and tools clear of the plate; switch off and isolate the system as the manufacturer specifies before inspection or cleaning. Do not force a motorised plate, energise the actuator directly or spray cleaner into electronics unless the vehicle procedure explicitly permits it. Use the specified cleaner and method, and replace seals where required.

Fit the correct sensor or complete throttle assembly as specified. Some vehicles require an idle or throttle position relearn after cleaning, replacement or power interruption; others have different procedures. Clear codes at the appropriate stage, repeat the test, check for intake leaks and verify idle and response. A returning code requires a fresh diagnosis rather than repeated calibration.

Related diagnostic guides

For further system background see electronic throttle control and throttle body.