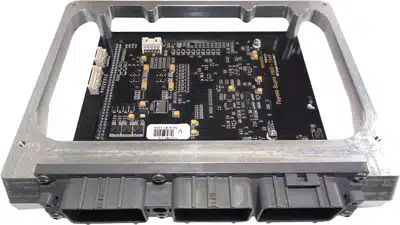
Vi-PEC V Series Subaru V10 is a V Series plug-in ECU documented for Subaru V10 2004–2007 applications; Link lists two date ranges, requiring exact manual and plug verification. It is a vehicle-specific replacement board, and the precise model year, engine, ECU connector and market variant must be checked against the installation guide. Link's Vi-PEC manual index.
Installation and pin functions
Use the specific Vi-PEC installation manual for this application. Its installation instructions and pin-function sections identify connections and application differences; a similarly named V Series plug-in board for another vehicle must not be used as a wiring reference. Check the original ECU part number and wiring before fitting.
Programming and support
Link lists Vi-PEC Tuning Software (VTS) for the V Series. Firmware compatibility and the calibration depend on the ECU version. Consult the software archive and retain the original calibration before any change.
Identification limits
This page is indexed by the documented application rather than an independently verified manufacturer SKU. Check the manual for exact compatibility and do not infer additional vehicle fitments.
Manufacturer pinout tables
These are the positions listed in the Vi-PEC Subaru V10 installation guide, pages 22–24. The guide specifies the view looking into the ECU from the wire side. It labels the first schedule 2004–2006 and the second 2007; the latter also contains individual rows marked 2006 or 2007. In the first schedule A28 is listed twice, once each as Aux 2 and Aux 1: verify the correct assignment with Vi-PEC. B26 and B27 depend on jumper settings. Omitted factory cavities are not assumed unused.
2004–2006: documented main-connector positions
| Position | ECU function |
|---|---|
| A1 | DI4 |
| A8 | Aux8 |
| A11 | Aux7 |
| A14 | Inj5 |
| A15 | Inj6 |
| A17 | Aux6 |
| A23 | Aux3 |
| A28 | Aux2 |
| A28 | Aux1 |
| B2 | Inj7 |
| B8 | Trig2 |
| B9 | DI2 |
| B10 | Trig1 |
| B15 | Ign4 |
| B16 | Ign3 |
| B17 | Ign2 |
| B18 | Ign1 |
| B24 | Ign5 |
| B25 | Ign7 |
| B26 | DI1/Aux4 (Jumper Setting) |
| B27 | DI1/Aux4 (jumper Setting) |
| B33 | Ign6 |
| B35 | Ign8 |
| C3 | Inj4 |
| C4 | Inj3 |
| C5 | Inj2 |
| C6 | Inj1 |
| C7 | DI10 |
| C9 | DI5 |
| C10 | DI6 |
| C11 | DI7 |
| C12 | Temp3 |
| C13 | Temp2 |
| C14 | Temp1 |
| C17 | AnVolt10 |
| C18 | AnVolt2 |
| C22 | AnVolt1 |
| C23 | AnVolt8 |
| C25 | Knock1 |
| C26 | AnVolt4 |
| C27 | AnVolt5 |
| C28 | AnVolt9 |
| C29 | AnVolt3 |
| D4 | Aux9 |
| D5 | Aux10 |
| D8 | DI8 |
| D9 | DI9 |
| D10 | AnVolt6 |
| D25 | AnVolt7 |
2007: documented main-connector positions
| Position | ECU function |
|---|---|
| A6 | AnVolt1 |
| A11 | DI2 |
| A13 | Trig1 |
| A15 | Knock1 |
| A16 | AnVolt4 |
| A18 | AnVolt2 |
| A21 | Trig2 |
| A26 | AnVolt5 |
| A28 | AnVolt3 |
| A33 | AnVolt6 |
| A34 | Temp1 |
| B4 | AnVolt7 |
| B6 | Inj6 |
| B12 | DI10 |
| B13 | DI6 |
| B17 | Temp3 |
| B18 | Temp2 |
| B20 | DI5 |
| B23 | AnVolt10 |
| B24 | DI7 |
| B26 | AnVolt8 |
| B31 | AnVolt9 |
| B33 | Aux4 ('06) |
| C4 | Inj7 |
| C9 | Ign6 |
| C11 | Aux6 |
| C12 | Aux4 ('07) |
| C13 | DI1 |
| C18 | Ign7 |
| C21 | Ign8 |
| C22 | Aux3 |
| C23 | DI3 ('07) |
| C24 | DI3 ('06) |
| C25 | DI4 |
| C29 | Ign5 |
| C31 | DI9 |
| C32 | DI8 |
| D4 | Aux9 |
| D5 | Aux10 |
| D8 | Inj1 |
| D9 | Inj2 |
| D10 | Inj3 |
| D11 | Inj4 |
| D13 | Aux8 |
| D14 | Aux1 |
| D16 | Aux2 |
| D18 | Ign1 |
| D19 | Ign2 |
| D20 | Ign3 |
| D21 | Ign4 |
| D22 | Aux7 |
| D27 | Aux5 |
| D29 | Inj5 |
Wideband lambda expansion connector, guide page 12
| Position | ECU function |
|---|---|
| 1 | An Volt 11 |
| 2 | +14 V from main relay |
| 3 | Power ground |
| 4 | Signal ground |