Removed text is struck through; added text is highlighted.
MoTeC C185 (MoTeC part #18068) is a motorsport display and acquisition device. The information here is specific to the cited part; check the label, hardware revision, options and vehicle protocol before connection.
MoTeC C185. Image: MoTeC, reproduced with permission. Manufacturer product page and specifications.
Specifications and options
5-inch colour TFT display, 800 × 480 pixels, configurable layouts and programmable channels.250 MB internal logging; USB logging upgrade increases internal storage to 500 MB. Maximum logging rate is 1,000 samples per second.Four configurable CAN buses, RS232, ten analogue voltage and four analogue temperature inputs as standard; the 44 I/O upgrade increases those input counts. Features and expansion hardware require configuration.MoTeC lists 6–32 V DC operation, i2 analysis and optional T2 telemetry. External GPS and vehicle data require compatible equipment.
MoTeC identifies a previous part #18063; dimensions or construction may differ. Use the document for the unit in hand.
Connector and pinout
79-way (mating connector #68086): the table below follows the manufacturer’s pinout for part #18068. Check cavity numbering and the manufacturer's connector view; the functional map is not a physical connector-face drawing. Blank cells retain the source's unspecified function; do not assign them by assumption. Inputs marked as optional need the appropriate enabled upgrade.
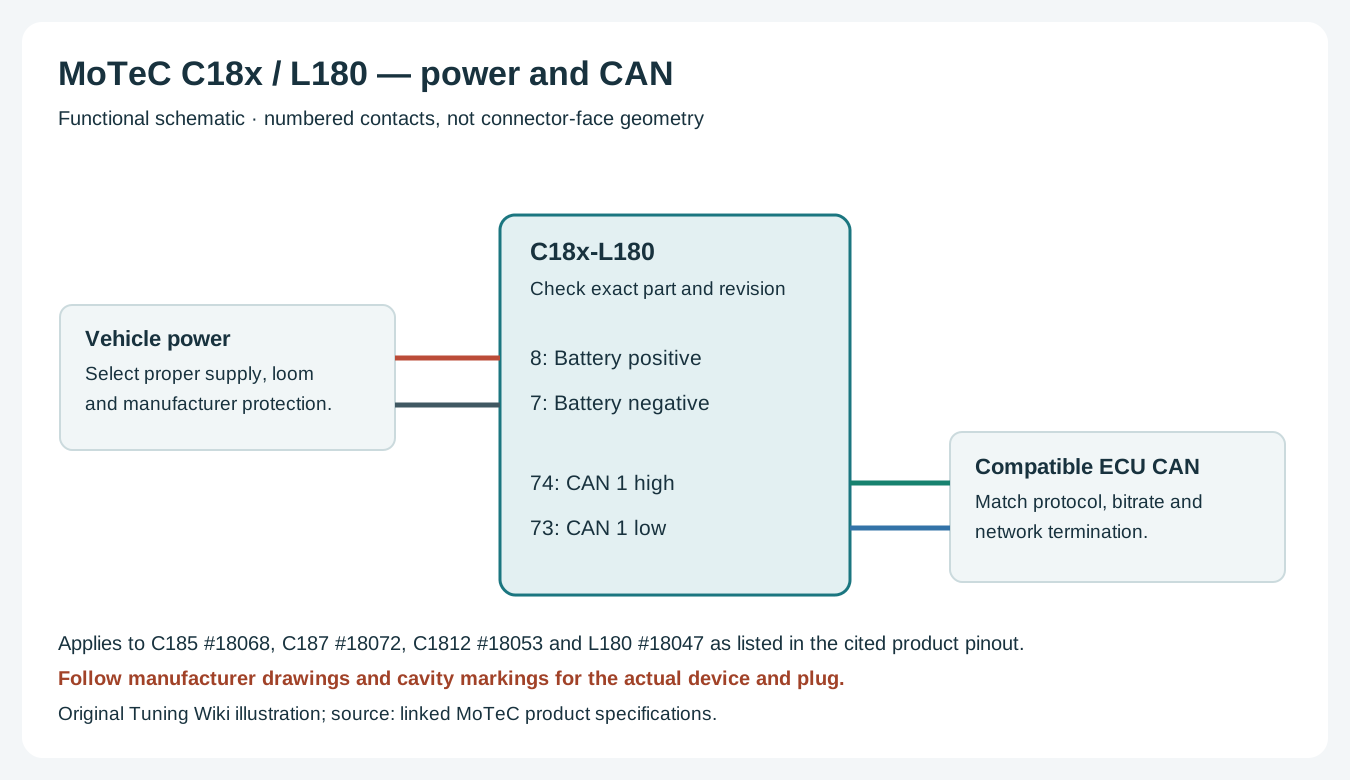
Power and CAN example, functional schematic rather than connector geometry. Original Tuning Wiki illustration based on the MoTeC product pinout; verify the actual harness and matching ECU.
Use the correct connector, power and sensor return for this unit. Match CAN high and low to a compatible, correctly configured network and check existing termination. ECU channels, sensors and lap timing depend on the specific hardware, protocol, configuration and licensed options. Use manufacturer instructions for wire gauge, supply protection and continuity checks; do not connect vehicle battery voltage to a sensor reference output.
MoTeC i2 supports reviewing recorded data; Pro analysis and T2 telemetry require the applicable upgrades. A telemetry licence alone does not provide a radio or cellular connection. See the MoTeC manufacturer guide for family comparisons and references.
Data analysis software
MoTeC i2 data analysis showing channel traces and gauges. Image: MoTeC, reproduced with permission; manufacturer image.
The C185 records data for later analysis; the exact memory, logging and Pro Analysis options depend on the unit and licence. MoTeC i2 reviews recorded channels in graphs and reports; i2 Pro features depend on the device upgrade or applicable software licence. See the manufacturer model and analysis comparison and i2 software and licence information.
Retrieve a recording with the compatible MoTeC device manager, then open it in i2 to compare channels and laps when suitable position data has been recorded. Download MoTeC software from the official downloads library; see the MoTeC manufacturer guide for the Standard and Pro options.
Rendered revisions
Open each version to inspect formatting, tables and photographs.
Revision 2: MoTeC C185
MoTeC C185 (MoTeC part #18068) is a motorsport display and acquisition device. The information here is specific to the cited part; check the label, hardware revision, options and vehicle protocol before connection.
250 MB internal logging; USB logging upgrade increases internal storage to 500 MB. Maximum logging rate is 1,000 samples per second.
Four configurable CAN buses, RS232, ten analogue voltage and four analogue temperature inputs as standard; the 44 I/O upgrade increases those input counts. Features and expansion hardware require configuration.
MoTeC lists 6–32 V DC operation, i2 analysis and optional T2 telemetry. External GPS and vehicle data require compatible equipment.
MoTeC identifies a previous part #18063; dimensions or construction may differ. Use the document for the unit in hand.
Connector and pinout
79-way (mating connector #68086): the table below follows the manufacturer’s pinout for part #18068. Check cavity numbering and the manufacturer's connector view; the functional map is not a physical connector-face drawing. Blank cells retain the source's unspecified function; do not assign them by assumption. Inputs marked as optional need the appropriate enabled upgrade.
Pin
Name
Function
1
AV15
Analogue Voltage Input 15 (with I/O upgrade)
2
AV16
Analogue Voltage Input 16 (with I/O upgrade)
3
AV17
Analogue Voltage Input 17 (with I/O upgrade)
4
AV18
Analogue Voltage Input 18 (with I/O upgrade)
5
AV19
Analogue Voltage Input 19 (with I/O upgrade)
6
0V
Sensor 0 V
7
BAT–
Battery Negative
8
BAT+
Battery Positive
9
AUX1
Auxiliary Output 1
10
AUX2
Auxiliary Output 2
11
AUX3
Auxiliary Output 3
12
AUX4
Auxiliary Output 4
13
AUX5
Auxiliary Output 5
14
AUX6
Auxiliary Output 6
15
RS232-2 TX
RS232-2 Transmit Output
16
RS232-2 RX
RS232-2 Receive Input
17
0V
Sensor 0 V
18
5V
Sensor 5 V
19
AV7
Analogue Voltage Input 7
20
AV8
Analogue Voltage Input 8
21
AV9
Analogue Voltage Input 9
22
AV10
Analogue Voltage Input 10
23
AV11
Analogue Voltage Input 11 (with I/O upgrade)
24
AV12
Analogue Voltage Input 12 (with I/O upgrade)
25
AV13
Analogue Voltage Input 13 (with I/O upgrade)
26
AV14
Analogue Voltage Input 14 (with I/O upgrade)
27
0V
Sensor 0 V
28
5V
Sensor 5 V
29
VID1
Video Input 1
30
VID0V
Video 0 V
31
VID2
Video Input 2
32
VID3
Video Input 3
33
0V
Sensor 0 V
34
AT1
Analogue Temp Input 1
35
AT2
Analogue Temp Input 2
36
AT3
Analogue Temp Input 3
37
AT4
Analogue Temp Input 4
38
AT5
Analogue Temp Input 5 (with I/O upgrade)
39
AT6
Analogue Temp Input 6 (with I/O upgrade)
40
0V
Sensor 0 V
41
AT7
Analogue Temp Input 7 (with I/O upgrade)
42
AT8
Analogue Temp Input 8 (with I/O upgrade)
43
0V
Sensor 0 V
44
5V
Sensor 5 V
45
AV1
Analogue Voltage Input 1
46
AV2
Analogue Voltage Input 2
47
AV3
Analogue Voltage Input 3
48
AV4
Analogue Voltage Input 4
49
AV5
Analogue Voltage Input 5
50
AV6
Analogue Voltage Input 6
51
0V
Sensor 0 V
52
DIG1
Digital Input 1
53
DIG2
Digital Input 2
54
DIG3
Digital Input 3
55
DIG4
Digital Input 4
56
0V
Sensor 0 V
57
SW1
Switch Input 1
58
SW2
Switch Input 2
59
CAN4L
CAN 4 Low
60
CAN4H
CAN 4 High
61
0V
Sensor 0 V
62
8V
Sensor 8 V
63
SPD1
Speed Input 1
64
SPD2
Speed Input 2
65
SPD3
Speed Input 3
66
SPD4
Speed Input 4
67
E-TX+
Ethernet Transmit +
68
E-TX-
Ethernet Transmit –
69
AV20
Analogue Voltage Input 20 (with I/O upgrade)
70
RS232-1 TX
RS232 Transmit Output
71
CAN3L
CAN 3 Lo
72
CAN3H
CAN 3 Hi
73
CAN1L
CAN 1 Lo
74
CAN1H
CAN 1 Hi
75
CAN2L
CAN 2 Lo/RS232 Ground Input
76
CAN2H
CAN 2 Hi/RS232 Receive Input
77
E-RX+
Ethernet Receive +
78
E-RX–
Ethernet Receive –
79
RS232-1 RX
RS232 Receive Input
Wiring and configuration
Power and CAN example, functional schematic rather than connector geometry. Original Tuning Wiki illustration based on the MoTeC product pinout; verify the actual harness and matching ECU.
Use the correct connector, power and sensor return for this unit. Match CAN high and low to a compatible, correctly configured network and check existing termination. ECU channels, sensors and lap timing depend on the specific hardware, protocol, configuration and licensed options. Use manufacturer instructions for wire gauge, supply protection and continuity checks; do not connect vehicle battery voltage to a sensor reference output.
MoTeC i2 supports reviewing recorded data; Pro analysis and T2 telemetry require the applicable upgrades. A telemetry licence alone does not provide a radio or cellular connection. See the MoTeC manufacturer guide for family comparisons and references.
Data analysis software
MoTeC i2 data analysis showing channel traces and gauges. Image: MoTeC, reproduced with permission; manufacturer image.
The C185 records data for later analysis; the exact memory, logging and Pro Analysis options depend on the unit and licence. MoTeC i2 reviews recorded channels in graphs and reports; i2 Pro features depend on the device upgrade or applicable software licence. See the manufacturer model and analysis comparison and i2 software and licence information.
MoTeC C185 (MoTeC part #18068) is a motorsport display and acquisition device. The information here is specific to the cited part; check the label, hardware revision, options and vehicle protocol before connection.
250 MB internal logging; USB logging upgrade increases internal storage to 500 MB. Maximum logging rate is 1,000 samples per second.
Four configurable CAN buses, RS232, ten analogue voltage and four analogue temperature inputs as standard; the 44 I/O upgrade increases those input counts. Features and expansion hardware require configuration.
MoTeC lists 6–32 V DC operation, i2 analysis and optional T2 telemetry. External GPS and vehicle data require compatible equipment.
MoTeC identifies a previous part #18063; dimensions or construction may differ. Use the document for the unit in hand.
Connector and pinout
79-way (mating connector #68086): the table below follows the manufacturer’s pinout for part #18068. Check cavity numbering and the manufacturer's connector view; the functional map is not a physical connector-face drawing. Blank cells retain the source's unspecified function; do not assign them by assumption. Inputs marked as optional need the appropriate enabled upgrade.
Pin
Name
Function
1
AV15
Analogue Voltage Input 15 (with I/O upgrade)
2
AV16
Analogue Voltage Input 16 (with I/O upgrade)
3
AV17
Analogue Voltage Input 17 (with I/O upgrade)
4
AV18
Analogue Voltage Input 18 (with I/O upgrade)
5
AV19
Analogue Voltage Input 19 (with I/O upgrade)
6
0V
Sensor 0 V
7
BAT–
Battery Negative
8
BAT+
Battery Positive
9
AUX1
Auxiliary Output 1
10
AUX2
Auxiliary Output 2
11
AUX3
Auxiliary Output 3
12
AUX4
Auxiliary Output 4
13
AUX5
Auxiliary Output 5
14
AUX6
Auxiliary Output 6
15
RS232-2 TX
RS232-2 Transmit Output
16
RS232-2 RX
RS232-2 Receive Input
17
0V
Sensor 0 V
18
5V
Sensor 5 V
19
AV7
Analogue Voltage Input 7
20
AV8
Analogue Voltage Input 8
21
AV9
Analogue Voltage Input 9
22
AV10
Analogue Voltage Input 10
23
AV11
Analogue Voltage Input 11 (with I/O upgrade)
24
AV12
Analogue Voltage Input 12 (with I/O upgrade)
25
AV13
Analogue Voltage Input 13 (with I/O upgrade)
26
AV14
Analogue Voltage Input 14 (with I/O upgrade)
27
0V
Sensor 0 V
28
5V
Sensor 5 V
29
VID1
Video Input 1
30
VID0V
Video 0 V
31
VID2
Video Input 2
32
VID3
Video Input 3
33
0V
Sensor 0 V
34
AT1
Analogue Temp Input 1
35
AT2
Analogue Temp Input 2
36
AT3
Analogue Temp Input 3
37
AT4
Analogue Temp Input 4
38
AT5
Analogue Temp Input 5 (with I/O upgrade)
39
AT6
Analogue Temp Input 6 (with I/O upgrade)
40
0V
Sensor 0 V
41
AT7
Analogue Temp Input 7 (with I/O upgrade)
42
AT8
Analogue Temp Input 8 (with I/O upgrade)
43
0V
Sensor 0 V
44
5V
Sensor 5 V
45
AV1
Analogue Voltage Input 1
46
AV2
Analogue Voltage Input 2
47
AV3
Analogue Voltage Input 3
48
AV4
Analogue Voltage Input 4
49
AV5
Analogue Voltage Input 5
50
AV6
Analogue Voltage Input 6
51
0V
Sensor 0 V
52
DIG1
Digital Input 1
53
DIG2
Digital Input 2
54
DIG3
Digital Input 3
55
DIG4
Digital Input 4
56
0V
Sensor 0 V
57
SW1
Switch Input 1
58
SW2
Switch Input 2
59
CAN4L
CAN 4 Low
60
CAN4H
CAN 4 High
61
0V
Sensor 0 V
62
8V
Sensor 8 V
63
SPD1
Speed Input 1
64
SPD2
Speed Input 2
65
SPD3
Speed Input 3
66
SPD4
Speed Input 4
67
E-TX+
Ethernet Transmit +
68
E-TX-
Ethernet Transmit –
69
AV20
Analogue Voltage Input 20 (with I/O upgrade)
70
RS232-1 TX
RS232 Transmit Output
71
CAN3L
CAN 3 Lo
72
CAN3H
CAN 3 Hi
73
CAN1L
CAN 1 Lo
74
CAN1H
CAN 1 Hi
75
CAN2L
CAN 2 Lo/RS232 Ground Input
76
CAN2H
CAN 2 Hi/RS232 Receive Input
77
E-RX+
Ethernet Receive +
78
E-RX–
Ethernet Receive –
79
RS232-1 RX
RS232 Receive Input
Wiring and configuration
Power and CAN example, functional schematic rather than connector geometry. Original Tuning Wiki illustration based on the MoTeC product pinout; verify the actual harness and matching ECU.
Use the correct connector, power and sensor return for this unit. Match CAN high and low to a compatible, correctly configured network and check existing termination. ECU channels, sensors and lap timing depend on the specific hardware, protocol, configuration and licensed options. Use manufacturer instructions for wire gauge, supply protection and continuity checks; do not connect vehicle battery voltage to a sensor reference output.
MoTeC i2 supports reviewing recorded data; Pro analysis and T2 telemetry require the applicable upgrades. A telemetry licence alone does not provide a radio or cellular connection. See the MoTeC manufacturer guide for family comparisons and references.
Data analysis software
MoTeC i2 data analysis showing channel traces and gauges. Image: MoTeC, reproduced with permission; manufacturer image.
The C185 records data for later analysis; the exact memory, logging and Pro Analysis options depend on the unit and licence. MoTeC i2 reviews recorded channels in graphs and reports; i2 Pro features depend on the device upgrade or applicable software licence. See the manufacturer model and analysis comparison and i2 software and licence information.