Removed text is struck through; added text is highlighted.
AdBlue, also called diesel exhaust fluid (DEF), is used by selective catalytic reduction (SCR) systems to reduce nitrogen oxide emissions. A warning can result from low or contaminated fluid, a supply or dosing fault, a sensor or wiring problem, an exhaust leak, or catalyst performance. Read the fault information and test the system before replacing the tank, pump or NOx sensors.
Jump to: Pump diagnosis | Injector and dosing valve diagnosis | Related guides.
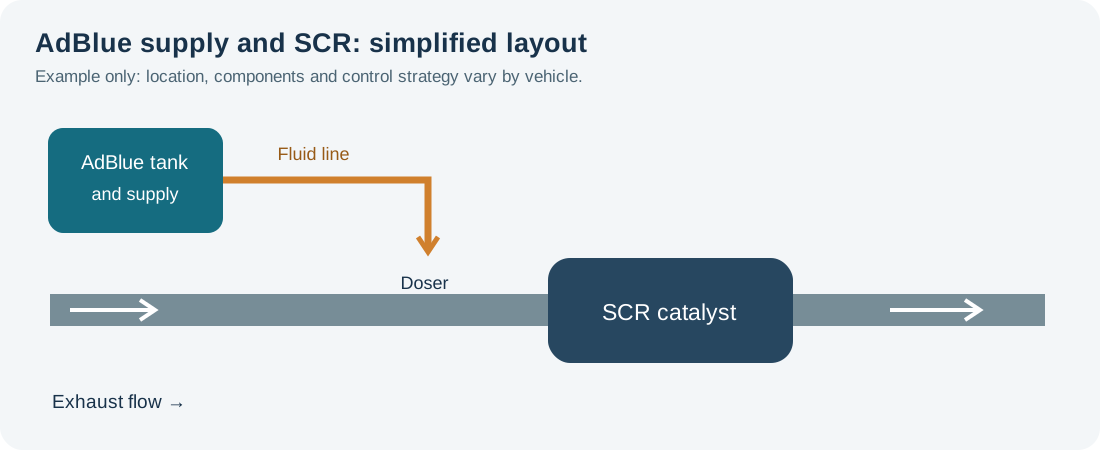
Conceptual SCR supply and dosing layout. Components and arrangements vary by vehicle. Original Tuning Wiki illustration by OpenAI Codex, commissioned for use on Tuning Wiki. Technical basis: Bosch supply module and dosing module.
Symptoms and first checks
ObservationWhat to investigate
Low AdBlue warningCheck the vehicle's required fluid, minimum refill quantity and recognition procedure. A low-level warning may differ from an SCR malfunction warning.
SCR, emissions or engine warningRecord all engine and aftertreatment codes and freeze-frame data. Check fluid supply, sensor and dosing faults and relevant service information.
Restart countdown or restricted operationFollow the vehicle's displayed instructions and arrange diagnosis promptly. The countdown may remain until the underlying fault is repaired and the specified verification completes.
Warning remains after topping upConfirm the correct fluid, required refill quantity and recognition conditions. A level sensor, fluid-quality, wiring or unrelated SCR fault can also be present.
White deposits around a line or injectorInspect for leaks, damaged seals, deposits and incorrect dosing using the manufacturer’s procedure. Residue alone does not prove an injector or catalyst is faulty.
Repeated fault after parts replacementRecheck wiring, fluid condition, exhaust leaks, correct part numbers, dosing operation and any required coding or adaptation.
Warnings and restart strategies depend on the vehicle and fault. A HELLA Audi A5 example describes fluid level, leaks and a possible software issue for specific vehicles. A countdown is not proof that the tank assembly has failed.
How the SCR system works
The system stores a high-purity urea-water solution in a separate tank. A supply system delivers it to a dosing valve, which introduces controlled amounts into the exhaust. The resulting ammonia helps the SCR catalyst convert nitrogen oxides into nitrogen and water. Sensors and control modules monitor system conditions and performance. Designs differ: tank, pump, heater, filter, sensors and electronics may be separate or integrated.
Many vehicles have NOx sensors and exhaust temperature sensors at different points. The ECU uses their information together with other operating data; sensor warm-up and exhaust temperature affect when certain checks can run. Some systems use multiple SCR catalysts or dosing points. See Bosch NOx sensor information and the NOx sensor diagnostic guide.
Common causes of faults
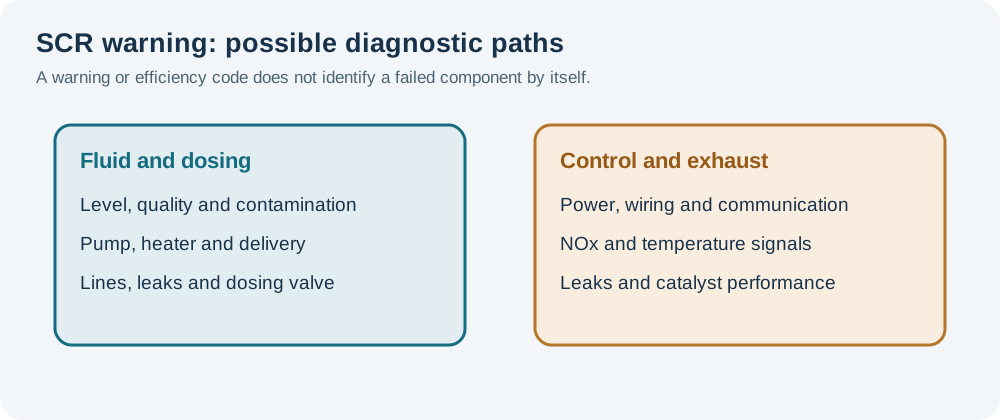
Use the fault record and tests to identify the affected part of the system. Original Tuning Wiki illustration by OpenAI Codex, commissioned for use on Tuning Wiki.
Fluid level or quality: insufficient fluid, incorrect or contaminated fluid, or a level/quality sensor fault can cause warnings.
Tank and supply: a pump, pressure sensor, filter, heater, frozen line or electrical fault can prevent the commanded delivery. Component layouts and serviceable parts vary.
Lines and dosing valve: leaks, blocked lines, damaged connections, deposits or a faulty dosing valve can affect delivery.
Wiring and communications: corrosion, water ingress, damaged harnesses, blown fuses, power or ground faults and network problems can affect any SCR module.
Sensor and exhaust faults: NOx or temperature sensor problems, exhaust leaks, incorrect engine-out emissions or catalyst deterioration can produce a performance warning.
Software or configuration: an applicable manufacturer bulletin, control-unit update, adaptation or correct part identification may be relevant after the other causes have been checked.
Fault codes: use the complete description
P20EE is commonly associated with SCR NOx catalyst efficiency below the expected threshold; P204F can refer to reductant system performance, and P20E8 to reductant pressure too low. Manufacturer definitions, suffixes, bank identification and diagnostic conditions vary. These codes describe a detected condition, not a guaranteed failed component. A Volkswagen technical tip lists P20EE and P204F for its specified vehicles. HELLA's Peugeot Boxer bulletin gives a model-specific P20EE example and calls for system checks before considering its listed software remedy.
Practical diagnostic sequence
Record the complaint. Save the complete codes, freeze-frame data and warning or countdown from engine and aftertreatment controllers. Record recent refills, repairs and relevant vehicle conditions before clearing codes.
Identify the system and check service information. Obtain the exact layout, fault-code procedure, tank and dosing arrangement, repair bulletins and relevant software requirements for the vehicle.
Check the fluid. Confirm the level and refill procedure. If quality or contamination is suspected, use the manufacturer-approved sampling and test method. A concentration reading alone may not identify every contaminant.
Inspect the installation. With the exhaust cooled and the system in the specified safe state, check the tank, lines, connectors, wiring and exhaust for leaks, damage, deposits and insecure mounting. Do not disturb a pressurised line.
Check power and data. Test fuses, supply, grounds and communication at the relevant modules according to the wiring diagram and fault tree. A missing message can have a network or supply cause.
Review live data. Check level, fluid temperature or quality, commanded dosing, supply pressure, sensor readiness, NOx readings and exhaust temperatures as supported. Account for warm-up and enabling conditions; do not compare a single reading with a generic threshold.
Test delivery and dosing. Use the manufacturer’s guided pressure, leak, quantity or actuator test with the specified equipment, containers and precautions. Separate a pump or supply fault from a dosing valve, wiring or line fault before replacing components.
Assess conversion performance. If dosing is correct but an efficiency fault remains, follow the prescribed checks for exhaust leaks, NOx sensor plausibility, temperature, engine operation and the SCR catalyst. An instantaneous upstream/downstream comparison alone does not prove catalyst failure.
Repair and verify. Correct the identified cause, carry out any required priming, adaptation, coding or reset, and complete the manufacturer’s verification procedure or drive cycle. Confirm fault memory and warning status, including any countdown.
AdBlue lines may remain pressurised and some systems purge fluid after the ignition is switched off. Wait and depressurise only as the manufacturer directs before disconnecting anything. Exhaust parts can remain very hot after operation or regeneration. Use suitable eye and skin protection, ventilation and spill-cleaning procedures.
Fluid, filling and contamination
Use fresh, vehicle-approved AdBlue/DEF meeting the specification in the owner’s manual, from a clean, sealed or suitable dedicated dispenser. Do not dilute it, add additives or transfer it using containers previously used for fuel, oil or other chemicals. Follow the vehicle's instructions for filler location and refill quantity.
If AdBlue is put into the diesel fuel tank, or diesel is put into the AdBlue tank, do not switch on the ignition or start the engine. Arrange recovery or specialist help and follow the manufacturer’s contamination procedure; operating pumps can spread contamination. Do not assume a simple top-up or dilution is an adequate repair.
AdBlue can freeze in cold conditions. Freezing alone does not prove the tank or pump has failed: systems may have heaters and specific cold-weather operating strategies. If a warning persists after the prescribed conditions are met, test the heater, temperature sensor, supply and control circuit. Bosch describes a heated supply module as one example; arrangements differ by vehicle. Bosch supply module information.
Deposits, dosing and catalyst efficiency
White residue can indicate crystallised fluid from a leak or deposits near the dosing point, but visual appearance alone cannot identify the cause. Check fluid lines and fittings, dosing quantity and spray characteristics, exhaust temperature and any relevant service bulletin using approved methods. Do not scrape, soak or heat a dosing valve unless the manufacturer permits it.
An SCR efficiency fault can arise from sensor errors, exhaust leaks, incorrect fluid delivery, engine-out emissions or catalyst deterioration. Compare upstream and downstream NOx data only when the relevant sensors are ready and the vehicle-specific monitor conditions are satisfied. Use the manufacturer’s guided assessment rather than replacing a catalyst based on one scan-tool snapshot.
After repair
Use the correct components and seals, route lines and wiring as specified, and perform any manufacturer-required priming, leak check, software configuration or adaptation. Clear faults at the appropriate step and complete the required verification drive or stationary test with the prescribed safety measures. Confirm that the warning and countdown have cleared according to the vehicle procedure; do not bypass or disable emissions controls.
AdBlue pump diagnosis
The AdBlue pump supplies diesel exhaust fluid (DEF) from its tank to the SCR dosing system. A low-pressure or supply warning does not necessarily mean the pump has failed: low fluid, leaks, restrictions, contamination, freezing, a pressure-sensor fault or an electrical problem can produce similar results. Test the complete supply system before replacing the pump or tank.
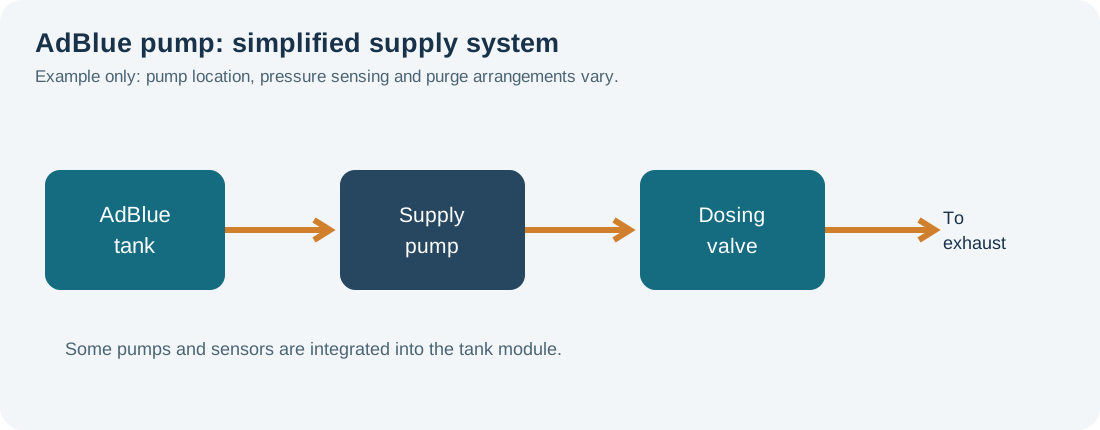
Conceptual AdBlue supply layout. On some vehicles the pump, sensors and heater are integrated into the tank module. Original Tuning Wiki illustration by OpenAI Codex, commissioned for use on Tuning Wiki. Technical basis: Bosch Denoxtronic supply module.
Symptoms and first checks
ObservationWhat to investigate
SCR, AdBlue or engine warningSave all engine and aftertreatment codes, freeze-frame data and operating conditions. Identify whether the fault concerns pressure, pump control, dosing, sensors or fluid quality.
Restart countdown or reduced performanceFollow the vehicle's instructions and arrange diagnosis promptly. A countdown can have several causes and may require a completed verification after repair.
Low reductant pressure or failed pressure build-upCheck fluid level and condition, leaks, restrictions, pump supply and command, pressure reading and prescribed priming before deciding the pump is faulty.
Warning after a refill or pump replacementCheck correct fluid, refill recognition, connections and the manufacturer's priming and leak-test procedure. Avoid applying another model's procedure.
Fault in cold weatherCheck fluid temperature, thawing conditions, heater and control faults using vehicle data. Freezing alone does not prove the pump has failed.
White residue around a hose or pumpInspect for a leak and identify its source. Residue can be dried fluid; appearance alone does not identify the failed part.
Warning and fallback strategies vary. HELLA describes pump-related pressure and contamination faults, while Bosch illustrates one integrated supply design.
What the pump does
The pump or supply module moves AdBlue from its separate tank to the dosing valve. The controller manages delivery and, depending on the design, monitors pressure and fluid temperature, level or quality. Some units combine the pump, heater, filter and sensors in or on the tank; other systems have separate serviceable components. Pressure control, return lines, purge strategy and available measurements differ by vehicle.
This pump handles reductant for exhaust aftertreatment. It is not the diesel lift pump or high-pressure fuel pump, and their pressures, fluids and test methods are not interchangeable.
Common causes of low-pressure and pump faults
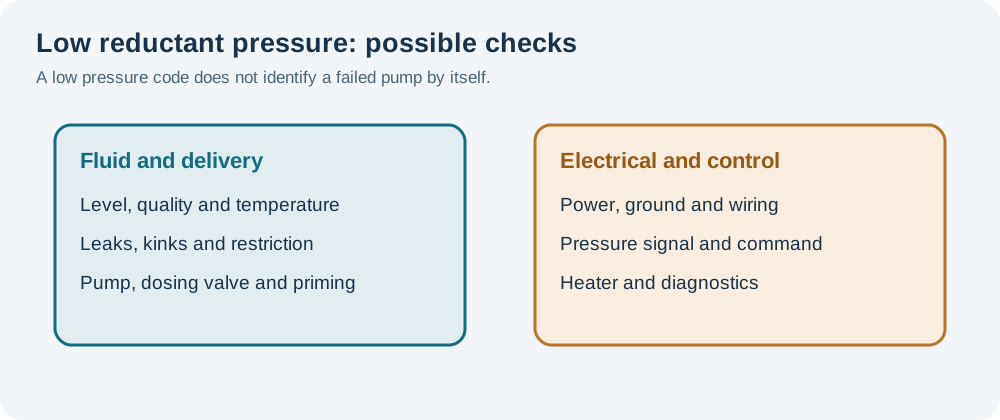
Check the fluid path and electrical control together. Original Tuning Wiki illustration by OpenAI Codex, commissioned for use on Tuning Wiki.
Fluid condition: insufficient, incorrect or contaminated fluid can prevent correct operation or damage components. A concentration test alone may not detect all contamination.
Leaks and restriction: damaged seals, loose couplings, kinked or blocked lines, a restricted filter or a leaking dosing valve can prevent pressure build-up or retention.
Electrical or control faults: blown fuses, wiring damage, corrosion, poor power or ground, network faults or a control-module problem can stop the pump or distort its readings.
Pressure measurement: an inaccurate pressure sensor or circuit can report an implausible value even if actual pressure differs.
Cold-weather issues: frozen fluid, a heater or temperature-sensor fault, or insufficient thaw time can affect dosing when the manufacturer’s enabling conditions are not met.
Mechanical failure or deposits: wear, internal pump damage or deposits can impair the supply. Determine and correct the cause before installing a replacement.
Fault codes and warnings
P20E8 commonly indicates reductant pressure too low; P208B can indicate reductant pump control performance on some vehicles. Other codes concern the pump circuit, pressure sensor, heater, dosing valve, fluid quality or SCR efficiency. The complete manufacturer-specific code, suffix and test conditions matter: P20E8 identifies low pressure, not the failed part. A manufacturer bulletin for specified 6.7-litre vehicles lists both codes and a software-related remedy for its applicable fault conditions.
Practical diagnostic sequence
Record the complaint. Save all engine and aftertreatment codes, freeze-frame data and any warning or restart countdown. Note weather, recent refills, repairs and whether pressure was reported during an active test.
Identify the system. Obtain the exact tank and pump layout, wiring diagram, pressure measurement method, applicable bulletins and guided test for the vehicle. Check whether the pump, filter or pressure sensor is separately serviceable.
Inspect the fluid and installation. Confirm the specified fluid and level, and check the tank, lines, connectors and visible fittings for leaks, damage, kinks and contamination. Use an approved sample test where fluid quality is in doubt.
Make the system safe. Allow hot exhaust components to cool. AdBlue lines can remain pressurised and some systems purge after shutdown. Wait and depressurise using the manufacturer's procedure before disconnecting a line.
Review live data and test conditions. Check fluid temperature, level, commanded pump or pressure, measured pressure and related heater or dosing faults as supported. Confirm the diagnostic routine's prerequisites; an inactive pump at key-on is not automatically faulty.
Check electrical supply and control. Follow the wiring diagram to test fuses, voltage supply, grounds and communication at the correct module. Check voltage drop or control signals only under the stated conditions and with suitable equipment.
Run the prescribed pressure and leak test. Use the manufacturer's scan-tool routine and rated test equipment. Compare measured results with that vehicle's limits, and distinguish a real leak or restriction from an inaccurate pressure input. Do not apply a universal pressure value.
Isolate the cause. Follow the approved procedure to check the supply line, dosing valve, pump and pressure sensor. Do not deadhead the pump, apply external pressure or substitute test fluid unless the manufacturer explicitly directs it.
Repair, prime and verify. Repair the confirmed fault, fit correct seals and connections, perform any specified priming or adaptation and repeat the leak and pressure tests. Complete the required verification cycle and confirm codes, warnings and countdown status.
Use clean, dedicated equipment and suitable eye and skin protection. Keep DEF out of electrical connectors and follow the manufacturer's spill-cleaning and disposal instructions. Never disconnect a hot exhaust or a pressurised line, bypass system safeguards, or run an improvised external pump test.
Pressure, leaks and priming
Low reported pressure can result from a real delivery problem, a leak or an incorrect measurement. Check commanded and measured pressure during the prescribed routine and use an independent gauge only where the vehicle maker specifies a safe connection, pressure range and method. A pump that runs or makes a noise is not automatically delivering the required pressure or flow.
After opening the system or replacing a pump, some vehicles require a scan-tool priming routine. Conditions and repetitions are model-specific. A GM bulletin describes a low-pressure condition after pump or tank replacement for its affected vehicles; it explicitly does not present that procedure as an initial diagnosis for every low-pressure fault.
Freezing, purge and deposits
AdBlue can freeze in cold conditions. Some systems use tank and line heaters and wait for suitable temperature and operating conditions before dosing. A frozen system alone is not proof of a defective pump. Follow the vehicle's cold-weather diagnostic conditions before testing heater circuits or replacing parts; a Bosch supply module uses an integrated heater as one example.
Some systems purge fluid from the line after shutdown to reduce freeze-related risk; the timing and method vary. Interrupting an applicable purge or disconnecting the battery or lines prematurely can affect the system. Follow the manufacturer’s shutdown and depressurisation procedure. Dried fluid around a connection warrants inspection for a leak, while internal deposits or contamination require the specified repair and cleaning process.
Fluid contamination and incorrect filling
Use fresh, vehicle-approved AdBlue/DEF in clean dedicated equipment. Do not dilute it, add additives or transfer it with equipment used for fuel or oil. A refractometer checks concentration where specified but does not rule out every contaminant. If contamination is suspected, follow the manufacturer’s sampling and system-cleaning procedure rather than repeatedly priming a contaminated system.
If AdBlue is put into the diesel fuel tank, or diesel is put into the AdBlue tank, do not switch on the ignition or start the engine. Arrange specialist assistance and follow the vehicle manufacturer’s contamination procedure; pump operation can spread contamination.
Replacement and final checks
Use the correct pump or complete tank assembly for the vehicle, and replace seals, filters and lines only as prescribed. Keep fluid away from electrical connectors and route and secure the harness and lines as specified. Some vehicles need priming, sensor initialisation or other adaptation; others use a different procedure.
After repair, verify pressure build-up, retention and dosing with the manufacturer's tests, then complete the required monitor or driving cycle. Confirm the original fault, warnings and countdown are resolved. If pressure remains incorrect, recheck the fluid path, pressure measurement and electrical evidence rather than replacing further parts by guesswork.
AdBlue injector and dosing valve diagnosis
The AdBlue injector, also called a reductant dosing valve or doser, meters diesel exhaust fluid (DEF) into the exhaust ahead of an SCR catalyst. A dosing fault can be electrical, mechanical or caused by the fluid supply, its lines or the exhaust. Deposits and an SCR warning do not automatically mean the injector has failed: check the complete system and use the vehicle manufacturer's test procedure.
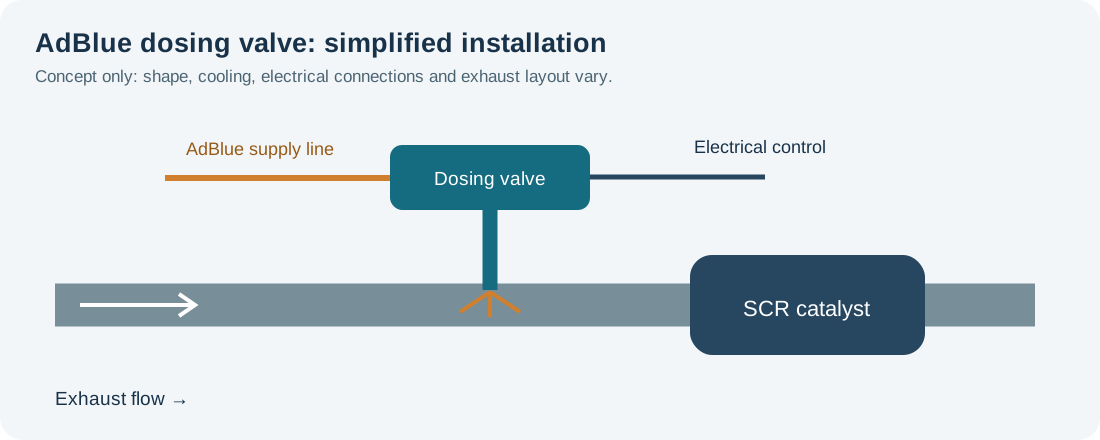
Conceptual dosing valve installation. Valve construction, cooling, wiring and exhaust layout vary. Original Tuning Wiki illustration by OpenAI Codex, commissioned for use on Tuning Wiki. Technical basis: Bosch Denoxtronic dosing module.
Symptoms and first checks
ObservationWhat to investigate
SCR, AdBlue or engine warningSave all relevant codes and freeze-frame data. Identify whether the fault concerns the valve circuit, fluid supply, dosing performance, NOx sensors or SCR efficiency.
Restart countdown or reduced performanceFollow the vehicle's displayed instructions and arrange diagnosis promptly. A countdown can have several causes and may need a completed verification after repair.
White deposits around the injector or lineIdentify whether residue is at the tip, a line connection or an exhaust joint. Inspect for leaks and assess deposits using the manufacturer's procedure.
Low or absent dosingCheck fluid quality, supply, pressure, valve command, wiring and the manufacturer-specified dosing test before replacing the valve.
Recurring SCR efficiency faultInvestigate dosing, sensor readiness, exhaust leaks, fluid quality and catalyst conditions. A single NOx or temperature snapshot is not enough to identify the cause.
Fault after exhaust or tank workCheck part and installation position, seals, connections, line routing and any required priming or adaptation.
How the dosing valve works
The SCR supply system delivers AdBlue to the dosing module. The controller operates the valve according to the vehicle's exhaust conditions and emissions strategy; the injected fluid forms ammonia that helps the SCR catalyst reduce nitrogen oxides. Dosing conditions, spray pattern and components differ, and some commercial-vehicle valves have cooling arrangements. This is an exhaust aftertreatment injector, not an engine fuel injector. Bosch describes the dosing module and its function.
Fluid supply pressure, temperature and dosing command need to be evaluated together. A valve may not be commanded to operate until the relevant conditions are met; a quiet valve at idle or with a cold exhaust is not automatically faulty.
Common causes of dosing faults
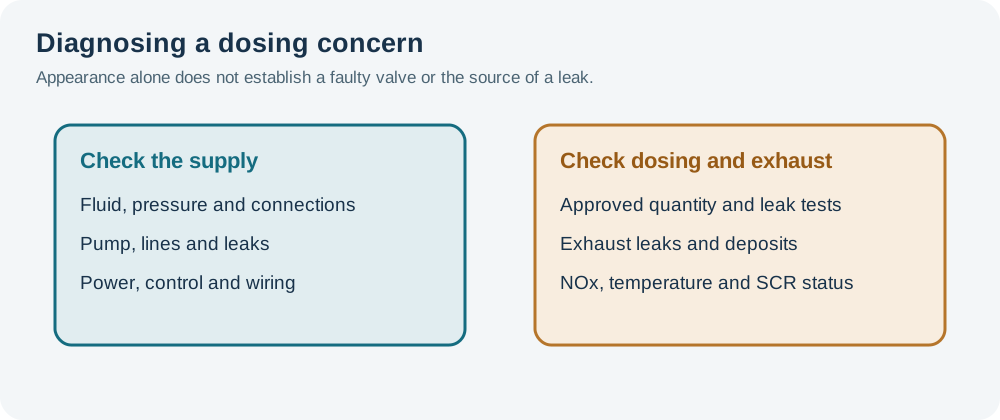
Check the supply and electrical control as well as the dosing valve and exhaust. Original Tuning Wiki illustration by OpenAI Codex, commissioned for use on Tuning Wiki.
Supply problems: low or contaminated fluid, a pump or pressure fault, blocked line, freezing or a leaking connection can affect delivery.
Electrical faults: damaged wires, loose terminals, corrosion, missing supply or control faults can prevent valve operation.
Valve or nozzle faults: leakage, damage, sticking or deposits may affect a dosing test. Confirm the result under the prescribed test conditions.
Exhaust or installation faults: damaged seals, an exhaust leak, incorrect mounting, wrong part, heat damage or restricted mixing can affect system performance.
Related sensor or catalyst faults: NOx sensors, temperature signals, the SCR catalyst or engine operation may cause an SCR warning even when dosing is correct.
White crystals: normal residue or a leak?
A small amount of crystallised DEF at a dosing tip can be normal on some systems. A Hino technical tip for specified trucks advises against replacing the injector for tip crystallisation alone. A Volvo truck diagnostic note likewise says minor crystals and a wet valve tip can be normal for the systems it covers. These examples do not establish a universal acceptance limit.
Residue at a supply-line connection may instead point to an external leak. A Volkswagen bulletin for affected vehicles identifies a line-connection leak where the prescribed repair concerns the line rather than the injector. Trace the exact source and follow the correct vehicle bulletin; do not diagnose from colour or deposits alone.
Fault codes and warnings
Codes may identify a reductant injector circuit, dosing performance, reductant pressure, fluid quality or SCR efficiency. P20E8 can indicate reductant pressure too low, while P20EE commonly indicates SCR NOx catalyst efficiency below threshold; neither alone proves an injector fault. See the Volkswagen technical tip and Audi diagnostic reference for examples scoped to their vehicles. Read the complete manufacturer-specific code, suffix, bank and test plan.
Practical diagnostic sequence
Record the complaint. Save all engine and aftertreatment codes, freeze-frame data and warning or countdown information. Note recent refills, exhaust work, sensor replacements and conditions when the fault appears.
Identify the system. Find the correct doser, supply and return arrangement if present, wiring, cooling and vehicle-specific test procedure. Some vehicles have more than one dosing point.
Make the system safe. Let hot exhaust components cool. The fluid system can remain pressurised and may purge after shutdown; wait and depressurise only as directed. Secure the vehicle and follow the prescribed workshop precautions.
Inspect the valve, line and exhaust. Check for damaged connectors, harness chafing, loose fittings, external leaks and deposits. Distinguish residue at the nozzle tip from leakage at a fluid fitting or an exhaust joint.
Check fluid and supply. Confirm the specified fluid and adequate level; if contamination is suspected, use the approved sampling procedure. Review pump operation, line condition and actual versus commanded pressure where supported.
Check electrical control. Use the vehicle wiring diagram and guided fault test for power, ground, control and any relevant communication. Do not apply battery voltage directly to an unidentified valve or probe unspecified pins.
Perform the approved dosing and leak test. Use the manufacturer's diagnostic routine, prescribed pressure, collection equipment and test conditions. Record quantity and response against the exact vehicle limits. Some tests include a purge or bleed phase; interpret leakage only during the phase and conditions defined by that procedure.
Investigate related faults. If supply and dosing pass, assess exhaust leaks, NOx and temperature sensor readiness, engine conditions and SCR efficiency using the specified diagnostic sequence.
Repair and verify. Repair the confirmed leak, circuit, supply or valve fault. Fit specified seals, complete required priming or adaptation, and carry out the prescribed leak check and verification drive or monitor test. Confirm warning and countdown status.
Use suitable eye and skin protection and clean, dedicated equipment for DEF. Never disconnect a hot exhaust or pressurised line, spray fluid towards a person, or run an improvised external dosing test. Follow the manufacturer's directions for ventilation, fluid disposal and fire precautions.
Dosing quantity, spray and leakage
A proper diagnostic test considers supply pressure, valve command, measured fluid quantity and the exact test phase. A result outside the specified quantity can be caused by fluid supply, a restriction, a leak or the valve itself; repeat or isolate tests only as the vehicle procedure instructs. Use the required graduated container and record the result rather than applying a value from another engine.
Some procedures also assess leakage or spray characteristics. A wet tip, a small amount released during a bleed or the appearance of a spray are meaningful only in the context of the specific test. The Volvo truck note illustrates why test phase and accurate quantity measurement matter; do not apply its values or criteria to other vehicles.
Cleaning, replacement and verification
Clean deposits only when the manufacturer approves the method for that component and location. Do not poke the nozzle, use aggressive solvents, scrape sealing surfaces, apply open flame or immerse electronics. If a valve or line must be replaced, use the correct part, new seals where specified and the required fitting torque and routing.
After repair, follow the exact priming, leak-check, coding or adaptation instructions. Complete the specified monitor or road test, check SCR data and fault memory, and confirm any restart warning is resolved according to the vehicle procedure. Do not disable emissions controls or clear faults repeatedly in place of a repair.
Related diagnostic guides
NOx sensor faultsDPF differential pressure sensor faultsExhaust gas temperature sensor faultsDPF faultsEGR faultsCommon diesel engine problems
Rendered revisions
Open each version to inspect formatting, tables and photographs.
Revision 4: Common AdBlue and SCR system faults: symptoms, checks and diagnosis
AdBlue, also called diesel exhaust fluid (DEF), is used by selective catalytic reduction (SCR) systems to reduce nitrogen oxide emissions. A warning can result from low or contaminated fluid, a supply or dosing fault, a sensor or wiring problem, an exhaust leak, or catalyst performance. Read the fault information and test the system before replacing the tank, pump or NOx sensors.
Conceptual SCR supply and dosing layout. Components and arrangements vary by vehicle. Original Tuning Wiki illustration by OpenAI Codex, commissioned for use on Tuning Wiki. Technical basis: Bosch supply module and dosing module.
Symptoms and first checks
Observation
What to investigate
Low AdBlue warning
Check the vehicle's required fluid, minimum refill quantity and recognition procedure. A low-level warning may differ from an SCR malfunction warning.
SCR, emissions or engine warning
Record all engine and aftertreatment codes and freeze-frame data. Check fluid supply, sensor and dosing faults and relevant service information.
Restart countdown or restricted operation
Follow the vehicle's displayed instructions and arrange diagnosis promptly. The countdown may remain until the underlying fault is repaired and the specified verification completes.
Warning remains after topping up
Confirm the correct fluid, required refill quantity and recognition conditions. A level sensor, fluid-quality, wiring or unrelated SCR fault can also be present.
White deposits around a line or injector
Inspect for leaks, damaged seals, deposits and incorrect dosing using the manufacturer’s procedure. Residue alone does not prove an injector or catalyst is faulty.
Repeated fault after parts replacement
Recheck wiring, fluid condition, exhaust leaks, correct part numbers, dosing operation and any required coding or adaptation.
Warnings and restart strategies depend on the vehicle and fault. A HELLA Audi A5 example describes fluid level, leaks and a possible software issue for specific vehicles. A countdown is not proof that the tank assembly has failed.
How the SCR system works
The system stores a high-purity urea-water solution in a separate tank. A supply system delivers it to a dosing valve, which introduces controlled amounts into the exhaust. The resulting ammonia helps the SCR catalyst convert nitrogen oxides into nitrogen and water. Sensors and control modules monitor system conditions and performance. Designs differ: tank, pump, heater, filter, sensors and electronics may be separate or integrated.
Many vehicles have NOx sensors and exhaust temperature sensors at different points. The ECU uses their information together with other operating data; sensor warm-up and exhaust temperature affect when certain checks can run. Some systems use multiple SCR catalysts or dosing points. See Bosch NOx sensor information and the NOx sensor diagnostic guide.
Common causes of faults
Use the fault record and tests to identify the affected part of the system. Original Tuning Wiki illustration by OpenAI Codex, commissioned for use on Tuning Wiki.
Fluid level or quality: insufficient fluid, incorrect or contaminated fluid, or a level/quality sensor fault can cause warnings.
Tank and supply: a pump, pressure sensor, filter, heater, frozen line or electrical fault can prevent the commanded delivery. Component layouts and serviceable parts vary.
Lines and dosing valve: leaks, blocked lines, damaged connections, deposits or a faulty dosing valve can affect delivery.
Wiring and communications: corrosion, water ingress, damaged harnesses, blown fuses, power or ground faults and network problems can affect any SCR module.
Sensor and exhaust faults: NOx or temperature sensor problems, exhaust leaks, incorrect engine-out emissions or catalyst deterioration can produce a performance warning.
Software or configuration: an applicable manufacturer bulletin, control-unit update, adaptation or correct part identification may be relevant after the other causes have been checked.
Fault codes: use the complete description
P20EE is commonly associated with SCR NOx catalyst efficiency below the expected threshold; P204F can refer to reductant system performance, and P20E8 to reductant pressure too low. Manufacturer definitions, suffixes, bank identification and diagnostic conditions vary. These codes describe a detected condition, not a guaranteed failed component. A Volkswagen technical tip lists P20EE and P204F for its specified vehicles. HELLA's Peugeot Boxer bulletin gives a model-specific P20EE example and calls for system checks before considering its listed software remedy.
Practical diagnostic sequence
Record the complaint. Save the complete codes, freeze-frame data and warning or countdown from engine and aftertreatment controllers. Record recent refills, repairs and relevant vehicle conditions before clearing codes.
Identify the system and check service information. Obtain the exact layout, fault-code procedure, tank and dosing arrangement, repair bulletins and relevant software requirements for the vehicle.
Check the fluid. Confirm the level and refill procedure. If quality or contamination is suspected, use the manufacturer-approved sampling and test method. A concentration reading alone may not identify every contaminant.
Inspect the installation. With the exhaust cooled and the system in the specified safe state, check the tank, lines, connectors, wiring and exhaust for leaks, damage, deposits and insecure mounting. Do not disturb a pressurised line.
Check power and data. Test fuses, supply, grounds and communication at the relevant modules according to the wiring diagram and fault tree. A missing message can have a network or supply cause.
Review live data. Check level, fluid temperature or quality, commanded dosing, supply pressure, sensor readiness, NOx readings and exhaust temperatures as supported. Account for warm-up and enabling conditions; do not compare a single reading with a generic threshold.
Test delivery and dosing. Use the manufacturer’s guided pressure, leak, quantity or actuator test with the specified equipment, containers and precautions. Separate a pump or supply fault from a dosing valve, wiring or line fault before replacing components.
Assess conversion performance. If dosing is correct but an efficiency fault remains, follow the prescribed checks for exhaust leaks, NOx sensor plausibility, temperature, engine operation and the SCR catalyst. An instantaneous upstream/downstream comparison alone does not prove catalyst failure.
Repair and verify. Correct the identified cause, carry out any required priming, adaptation, coding or reset, and complete the manufacturer’s verification procedure or drive cycle. Confirm fault memory and warning status, including any countdown.
AdBlue lines may remain pressurised and some systems purge fluid after the ignition is switched off. Wait and depressurise only as the manufacturer directs before disconnecting anything. Exhaust parts can remain very hot after operation or regeneration. Use suitable eye and skin protection, ventilation and spill-cleaning procedures.
Fluid, filling and contamination
Use fresh, vehicle-approved AdBlue/DEF meeting the specification in the owner’s manual, from a clean, sealed or suitable dedicated dispenser. Do not dilute it, add additives or transfer it using containers previously used for fuel, oil or other chemicals. Follow the vehicle's instructions for filler location and refill quantity.
If AdBlue is put into the diesel fuel tank, or diesel is put into the AdBlue tank, do not switch on the ignition or start the engine. Arrange recovery or specialist help and follow the manufacturer’s contamination procedure; operating pumps can spread contamination. Do not assume a simple top-up or dilution is an adequate repair.
AdBlue can freeze in cold conditions. Freezing alone does not prove the tank or pump has failed: systems may have heaters and specific cold-weather operating strategies. If a warning persists after the prescribed conditions are met, test the heater, temperature sensor, supply and control circuit. Bosch describes a heated supply module as one example; arrangements differ by vehicle. Bosch supply module information.
Deposits, dosing and catalyst efficiency
White residue can indicate crystallised fluid from a leak or deposits near the dosing point, but visual appearance alone cannot identify the cause. Check fluid lines and fittings, dosing quantity and spray characteristics, exhaust temperature and any relevant service bulletin using approved methods. Do not scrape, soak or heat a dosing valve unless the manufacturer permits it.
An SCR efficiency fault can arise from sensor errors, exhaust leaks, incorrect fluid delivery, engine-out emissions or catalyst deterioration. Compare upstream and downstream NOx data only when the relevant sensors are ready and the vehicle-specific monitor conditions are satisfied. Use the manufacturer’s guided assessment rather than replacing a catalyst based on one scan-tool snapshot.
After repair
Use the correct components and seals, route lines and wiring as specified, and perform any manufacturer-required priming, leak check, software configuration or adaptation. Clear faults at the appropriate step and complete the required verification drive or stationary test with the prescribed safety measures. Confirm that the warning and countdown have cleared according to the vehicle procedure; do not bypass or disable emissions controls.
AdBlue pump diagnosis
The AdBlue pump supplies diesel exhaust fluid (DEF) from its tank to the SCR dosing system. A low-pressure or supply warning does not necessarily mean the pump has failed: low fluid, leaks, restrictions, contamination, freezing, a pressure-sensor fault or an electrical problem can produce similar results. Test the complete supply system before replacing the pump or tank.
Conceptual AdBlue supply layout. On some vehicles the pump, sensors and heater are integrated into the tank module. Original Tuning Wiki illustration by OpenAI Codex, commissioned for use on Tuning Wiki. Technical basis: Bosch Denoxtronic supply module.
Symptoms and first checks
Observation
What to investigate
SCR, AdBlue or engine warning
Save all engine and aftertreatment codes, freeze-frame data and operating conditions. Identify whether the fault concerns pressure, pump control, dosing, sensors or fluid quality.
Restart countdown or reduced performance
Follow the vehicle's instructions and arrange diagnosis promptly. A countdown can have several causes and may require a completed verification after repair.
Low reductant pressure or failed pressure build-up
Check fluid level and condition, leaks, restrictions, pump supply and command, pressure reading and prescribed priming before deciding the pump is faulty.
Warning after a refill or pump replacement
Check correct fluid, refill recognition, connections and the manufacturer's priming and leak-test procedure. Avoid applying another model's procedure.
Fault in cold weather
Check fluid temperature, thawing conditions, heater and control faults using vehicle data. Freezing alone does not prove the pump has failed.
White residue around a hose or pump
Inspect for a leak and identify its source. Residue can be dried fluid; appearance alone does not identify the failed part.
Warning and fallback strategies vary. HELLA describes pump-related pressure and contamination faults, while Bosch illustrates one integrated supply design.
What the pump does
The pump or supply module moves AdBlue from its separate tank to the dosing valve. The controller manages delivery and, depending on the design, monitors pressure and fluid temperature, level or quality. Some units combine the pump, heater, filter and sensors in or on the tank; other systems have separate serviceable components. Pressure control, return lines, purge strategy and available measurements differ by vehicle.
This pump handles reductant for exhaust aftertreatment. It is not the diesel lift pump or high-pressure fuel pump, and their pressures, fluids and test methods are not interchangeable.
Common causes of low-pressure and pump faults
Check the fluid path and electrical control together. Original Tuning Wiki illustration by OpenAI Codex, commissioned for use on Tuning Wiki.
Fluid condition: insufficient, incorrect or contaminated fluid can prevent correct operation or damage components. A concentration test alone may not detect all contamination.
Leaks and restriction: damaged seals, loose couplings, kinked or blocked lines, a restricted filter or a leaking dosing valve can prevent pressure build-up or retention.
Electrical or control faults: blown fuses, wiring damage, corrosion, poor power or ground, network faults or a control-module problem can stop the pump or distort its readings.
Pressure measurement: an inaccurate pressure sensor or circuit can report an implausible value even if actual pressure differs.
Cold-weather issues: frozen fluid, a heater or temperature-sensor fault, or insufficient thaw time can affect dosing when the manufacturer’s enabling conditions are not met.
Mechanical failure or deposits: wear, internal pump damage or deposits can impair the supply. Determine and correct the cause before installing a replacement.
Fault codes and warnings
P20E8 commonly indicates reductant pressure too low; P208B can indicate reductant pump control performance on some vehicles. Other codes concern the pump circuit, pressure sensor, heater, dosing valve, fluid quality or SCR efficiency. The complete manufacturer-specific code, suffix and test conditions matter: P20E8 identifies low pressure, not the failed part. A manufacturer bulletin for specified 6.7-litre vehicles lists both codes and a software-related remedy for its applicable fault conditions.
Practical diagnostic sequence
Record the complaint. Save all engine and aftertreatment codes, freeze-frame data and any warning or restart countdown. Note weather, recent refills, repairs and whether pressure was reported during an active test.
Identify the system. Obtain the exact tank and pump layout, wiring diagram, pressure measurement method, applicable bulletins and guided test for the vehicle. Check whether the pump, filter or pressure sensor is separately serviceable.
Inspect the fluid and installation. Confirm the specified fluid and level, and check the tank, lines, connectors and visible fittings for leaks, damage, kinks and contamination. Use an approved sample test where fluid quality is in doubt.
Make the system safe. Allow hot exhaust components to cool. AdBlue lines can remain pressurised and some systems purge after shutdown. Wait and depressurise using the manufacturer's procedure before disconnecting a line.
Review live data and test conditions. Check fluid temperature, level, commanded pump or pressure, measured pressure and related heater or dosing faults as supported. Confirm the diagnostic routine's prerequisites; an inactive pump at key-on is not automatically faulty.
Check electrical supply and control. Follow the wiring diagram to test fuses, voltage supply, grounds and communication at the correct module. Check voltage drop or control signals only under the stated conditions and with suitable equipment.
Run the prescribed pressure and leak test. Use the manufacturer's scan-tool routine and rated test equipment. Compare measured results with that vehicle's limits, and distinguish a real leak or restriction from an inaccurate pressure input. Do not apply a universal pressure value.
Isolate the cause. Follow the approved procedure to check the supply line, dosing valve, pump and pressure sensor. Do not deadhead the pump, apply external pressure or substitute test fluid unless the manufacturer explicitly directs it.
Repair, prime and verify. Repair the confirmed fault, fit correct seals and connections, perform any specified priming or adaptation and repeat the leak and pressure tests. Complete the required verification cycle and confirm codes, warnings and countdown status.
Use clean, dedicated equipment and suitable eye and skin protection. Keep DEF out of electrical connectors and follow the manufacturer's spill-cleaning and disposal instructions. Never disconnect a hot exhaust or a pressurised line, bypass system safeguards, or run an improvised external pump test.
Pressure, leaks and priming
Low reported pressure can result from a real delivery problem, a leak or an incorrect measurement. Check commanded and measured pressure during the prescribed routine and use an independent gauge only where the vehicle maker specifies a safe connection, pressure range and method. A pump that runs or makes a noise is not automatically delivering the required pressure or flow.
After opening the system or replacing a pump, some vehicles require a scan-tool priming routine. Conditions and repetitions are model-specific. A GM bulletin describes a low-pressure condition after pump or tank replacement for its affected vehicles; it explicitly does not present that procedure as an initial diagnosis for every low-pressure fault.
Freezing, purge and deposits
AdBlue can freeze in cold conditions. Some systems use tank and line heaters and wait for suitable temperature and operating conditions before dosing. A frozen system alone is not proof of a defective pump. Follow the vehicle's cold-weather diagnostic conditions before testing heater circuits or replacing parts; a Bosch supply module uses an integrated heater as one example.
Some systems purge fluid from the line after shutdown to reduce freeze-related risk; the timing and method vary. Interrupting an applicable purge or disconnecting the battery or lines prematurely can affect the system. Follow the manufacturer’s shutdown and depressurisation procedure. Dried fluid around a connection warrants inspection for a leak, while internal deposits or contamination require the specified repair and cleaning process.
Fluid contamination and incorrect filling
Use fresh, vehicle-approved AdBlue/DEF in clean dedicated equipment. Do not dilute it, add additives or transfer it with equipment used for fuel or oil. A refractometer checks concentration where specified but does not rule out every contaminant. If contamination is suspected, follow the manufacturer’s sampling and system-cleaning procedure rather than repeatedly priming a contaminated system.
If AdBlue is put into the diesel fuel tank, or diesel is put into the AdBlue tank, do not switch on the ignition or start the engine. Arrange specialist assistance and follow the vehicle manufacturer’s contamination procedure; pump operation can spread contamination.
Replacement and final checks
Use the correct pump or complete tank assembly for the vehicle, and replace seals, filters and lines only as prescribed. Keep fluid away from electrical connectors and route and secure the harness and lines as specified. Some vehicles need priming, sensor initialisation or other adaptation; others use a different procedure.
After repair, verify pressure build-up, retention and dosing with the manufacturer's tests, then complete the required monitor or driving cycle. Confirm the original fault, warnings and countdown are resolved. If pressure remains incorrect, recheck the fluid path, pressure measurement and electrical evidence rather than replacing further parts by guesswork.
AdBlue injector and dosing valve diagnosis
The AdBlue injector, also called a reductant dosing valve or doser, meters diesel exhaust fluid (DEF) into the exhaust ahead of an SCR catalyst. A dosing fault can be electrical, mechanical or caused by the fluid supply, its lines or the exhaust. Deposits and an SCR warning do not automatically mean the injector has failed: check the complete system and use the vehicle manufacturer's test procedure.
Conceptual dosing valve installation. Valve construction, cooling, wiring and exhaust layout vary. Original Tuning Wiki illustration by OpenAI Codex, commissioned for use on Tuning Wiki. Technical basis: Bosch Denoxtronic dosing module.
Symptoms and first checks
Observation
What to investigate
SCR, AdBlue or engine warning
Save all relevant codes and freeze-frame data. Identify whether the fault concerns the valve circuit, fluid supply, dosing performance, NOx sensors or SCR efficiency.
Restart countdown or reduced performance
Follow the vehicle's displayed instructions and arrange diagnosis promptly. A countdown can have several causes and may need a completed verification after repair.
White deposits around the injector or line
Identify whether residue is at the tip, a line connection or an exhaust joint. Inspect for leaks and assess deposits using the manufacturer's procedure.
Low or absent dosing
Check fluid quality, supply, pressure, valve command, wiring and the manufacturer-specified dosing test before replacing the valve.
Recurring SCR efficiency fault
Investigate dosing, sensor readiness, exhaust leaks, fluid quality and catalyst conditions. A single NOx or temperature snapshot is not enough to identify the cause.
Fault after exhaust or tank work
Check part and installation position, seals, connections, line routing and any required priming or adaptation.
How the dosing valve works
The SCR supply system delivers AdBlue to the dosing module. The controller operates the valve according to the vehicle's exhaust conditions and emissions strategy; the injected fluid forms ammonia that helps the SCR catalyst reduce nitrogen oxides. Dosing conditions, spray pattern and components differ, and some commercial-vehicle valves have cooling arrangements. This is an exhaust aftertreatment injector, not an engine fuel injector. Bosch describes the dosing module and its function.
Fluid supply pressure, temperature and dosing command need to be evaluated together. A valve may not be commanded to operate until the relevant conditions are met; a quiet valve at idle or with a cold exhaust is not automatically faulty.
Common causes of dosing faults
Check the supply and electrical control as well as the dosing valve and exhaust. Original Tuning Wiki illustration by OpenAI Codex, commissioned for use on Tuning Wiki.
Supply problems: low or contaminated fluid, a pump or pressure fault, blocked line, freezing or a leaking connection can affect delivery.
Electrical faults: damaged wires, loose terminals, corrosion, missing supply or control faults can prevent valve operation.
Valve or nozzle faults: leakage, damage, sticking or deposits may affect a dosing test. Confirm the result under the prescribed test conditions.
Exhaust or installation faults: damaged seals, an exhaust leak, incorrect mounting, wrong part, heat damage or restricted mixing can affect system performance.
Related sensor or catalyst faults: NOx sensors, temperature signals, the SCR catalyst or engine operation may cause an SCR warning even when dosing is correct.
White crystals: normal residue or a leak?
A small amount of crystallised DEF at a dosing tip can be normal on some systems. A Hino technical tip for specified trucks advises against replacing the injector for tip crystallisation alone. A Volvo truck diagnostic note likewise says minor crystals and a wet valve tip can be normal for the systems it covers. These examples do not establish a universal acceptance limit.
Residue at a supply-line connection may instead point to an external leak. A Volkswagen bulletin for affected vehicles identifies a line-connection leak where the prescribed repair concerns the line rather than the injector. Trace the exact source and follow the correct vehicle bulletin; do not diagnose from colour or deposits alone.
Fault codes and warnings
Codes may identify a reductant injector circuit, dosing performance, reductant pressure, fluid quality or SCR efficiency. P20E8 can indicate reductant pressure too low, while P20EE commonly indicates SCR NOx catalyst efficiency below threshold; neither alone proves an injector fault. See the Volkswagen technical tip and Audi diagnostic reference for examples scoped to their vehicles. Read the complete manufacturer-specific code, suffix, bank and test plan.
Practical diagnostic sequence
Record the complaint. Save all engine and aftertreatment codes, freeze-frame data and warning or countdown information. Note recent refills, exhaust work, sensor replacements and conditions when the fault appears.
Identify the system. Find the correct doser, supply and return arrangement if present, wiring, cooling and vehicle-specific test procedure. Some vehicles have more than one dosing point.
Make the system safe. Let hot exhaust components cool. The fluid system can remain pressurised and may purge after shutdown; wait and depressurise only as directed. Secure the vehicle and follow the prescribed workshop precautions.
Inspect the valve, line and exhaust. Check for damaged connectors, harness chafing, loose fittings, external leaks and deposits. Distinguish residue at the nozzle tip from leakage at a fluid fitting or an exhaust joint.
Check fluid and supply. Confirm the specified fluid and adequate level; if contamination is suspected, use the approved sampling procedure. Review pump operation, line condition and actual versus commanded pressure where supported.
Check electrical control. Use the vehicle wiring diagram and guided fault test for power, ground, control and any relevant communication. Do not apply battery voltage directly to an unidentified valve or probe unspecified pins.
Perform the approved dosing and leak test. Use the manufacturer's diagnostic routine, prescribed pressure, collection equipment and test conditions. Record quantity and response against the exact vehicle limits. Some tests include a purge or bleed phase; interpret leakage only during the phase and conditions defined by that procedure.
Investigate related faults. If supply and dosing pass, assess exhaust leaks, NOx and temperature sensor readiness, engine conditions and SCR efficiency using the specified diagnostic sequence.
Repair and verify. Repair the confirmed leak, circuit, supply or valve fault. Fit specified seals, complete required priming or adaptation, and carry out the prescribed leak check and verification drive or monitor test. Confirm warning and countdown status.
Use suitable eye and skin protection and clean, dedicated equipment for DEF. Never disconnect a hot exhaust or pressurised line, spray fluid towards a person, or run an improvised external dosing test. Follow the manufacturer's directions for ventilation, fluid disposal and fire precautions.
Dosing quantity, spray and leakage
A proper diagnostic test considers supply pressure, valve command, measured fluid quantity and the exact test phase. A result outside the specified quantity can be caused by fluid supply, a restriction, a leak or the valve itself; repeat or isolate tests only as the vehicle procedure instructs. Use the required graduated container and record the result rather than applying a value from another engine.
Some procedures also assess leakage or spray characteristics. A wet tip, a small amount released during a bleed or the appearance of a spray are meaningful only in the context of the specific test. The Volvo truck note illustrates why test phase and accurate quantity measurement matter; do not apply its values or criteria to other vehicles.
Cleaning, replacement and verification
Clean deposits only when the manufacturer approves the method for that component and location. Do not poke the nozzle, use aggressive solvents, scrape sealing surfaces, apply open flame or immerse electronics. If a valve or line must be replaced, use the correct part, new seals where specified and the required fitting torque and routing.
After repair, follow the exact priming, leak-check, coding or adaptation instructions. Complete the specified monitor or road test, check SCR data and fault memory, and confirm any restart warning is resolved according to the vehicle procedure. Do not disable emissions controls or clear faults repeatedly in place of a repair.
Revision 4: Common AdBlue and SCR system faults: symptoms, checks and diagnosis
AdBlue, also called diesel exhaust fluid (DEF), is used by selective catalytic reduction (SCR) systems to reduce nitrogen oxide emissions. A warning can result from low or contaminated fluid, a supply or dosing fault, a sensor or wiring problem, an exhaust leak, or catalyst performance. Read the fault information and test the system before replacing the tank, pump or NOx sensors.
Conceptual SCR supply and dosing layout. Components and arrangements vary by vehicle. Original Tuning Wiki illustration by OpenAI Codex, commissioned for use on Tuning Wiki. Technical basis: Bosch supply module and dosing module.
Symptoms and first checks
Observation
What to investigate
Low AdBlue warning
Check the vehicle's required fluid, minimum refill quantity and recognition procedure. A low-level warning may differ from an SCR malfunction warning.
SCR, emissions or engine warning
Record all engine and aftertreatment codes and freeze-frame data. Check fluid supply, sensor and dosing faults and relevant service information.
Restart countdown or restricted operation
Follow the vehicle's displayed instructions and arrange diagnosis promptly. The countdown may remain until the underlying fault is repaired and the specified verification completes.
Warning remains after topping up
Confirm the correct fluid, required refill quantity and recognition conditions. A level sensor, fluid-quality, wiring or unrelated SCR fault can also be present.
White deposits around a line or injector
Inspect for leaks, damaged seals, deposits and incorrect dosing using the manufacturer’s procedure. Residue alone does not prove an injector or catalyst is faulty.
Repeated fault after parts replacement
Recheck wiring, fluid condition, exhaust leaks, correct part numbers, dosing operation and any required coding or adaptation.
Warnings and restart strategies depend on the vehicle and fault. A HELLA Audi A5 example describes fluid level, leaks and a possible software issue for specific vehicles. A countdown is not proof that the tank assembly has failed.
How the SCR system works
The system stores a high-purity urea-water solution in a separate tank. A supply system delivers it to a dosing valve, which introduces controlled amounts into the exhaust. The resulting ammonia helps the SCR catalyst convert nitrogen oxides into nitrogen and water. Sensors and control modules monitor system conditions and performance. Designs differ: tank, pump, heater, filter, sensors and electronics may be separate or integrated.
Many vehicles have NOx sensors and exhaust temperature sensors at different points. The ECU uses their information together with other operating data; sensor warm-up and exhaust temperature affect when certain checks can run. Some systems use multiple SCR catalysts or dosing points. See Bosch NOx sensor information and the NOx sensor diagnostic guide.
Common causes of faults
Use the fault record and tests to identify the affected part of the system. Original Tuning Wiki illustration by OpenAI Codex, commissioned for use on Tuning Wiki.
Fluid level or quality: insufficient fluid, incorrect or contaminated fluid, or a level/quality sensor fault can cause warnings.
Tank and supply: a pump, pressure sensor, filter, heater, frozen line or electrical fault can prevent the commanded delivery. Component layouts and serviceable parts vary.
Lines and dosing valve: leaks, blocked lines, damaged connections, deposits or a faulty dosing valve can affect delivery.
Wiring and communications: corrosion, water ingress, damaged harnesses, blown fuses, power or ground faults and network problems can affect any SCR module.
Sensor and exhaust faults: NOx or temperature sensor problems, exhaust leaks, incorrect engine-out emissions or catalyst deterioration can produce a performance warning.
Software or configuration: an applicable manufacturer bulletin, control-unit update, adaptation or correct part identification may be relevant after the other causes have been checked.
Fault codes: use the complete description
P20EE is commonly associated with SCR NOx catalyst efficiency below the expected threshold; P204F can refer to reductant system performance, and P20E8 to reductant pressure too low. Manufacturer definitions, suffixes, bank identification and diagnostic conditions vary. These codes describe a detected condition, not a guaranteed failed component. A Volkswagen technical tip lists P20EE and P204F for its specified vehicles. HELLA's Peugeot Boxer bulletin gives a model-specific P20EE example and calls for system checks before considering its listed software remedy.
Practical diagnostic sequence
Record the complaint. Save the complete codes, freeze-frame data and warning or countdown from engine and aftertreatment controllers. Record recent refills, repairs and relevant vehicle conditions before clearing codes.
Identify the system and check service information. Obtain the exact layout, fault-code procedure, tank and dosing arrangement, repair bulletins and relevant software requirements for the vehicle.
Check the fluid. Confirm the level and refill procedure. If quality or contamination is suspected, use the manufacturer-approved sampling and test method. A concentration reading alone may not identify every contaminant.
Inspect the installation. With the exhaust cooled and the system in the specified safe state, check the tank, lines, connectors, wiring and exhaust for leaks, damage, deposits and insecure mounting. Do not disturb a pressurised line.
Check power and data. Test fuses, supply, grounds and communication at the relevant modules according to the wiring diagram and fault tree. A missing message can have a network or supply cause.
Review live data. Check level, fluid temperature or quality, commanded dosing, supply pressure, sensor readiness, NOx readings and exhaust temperatures as supported. Account for warm-up and enabling conditions; do not compare a single reading with a generic threshold.
Test delivery and dosing. Use the manufacturer’s guided pressure, leak, quantity or actuator test with the specified equipment, containers and precautions. Separate a pump or supply fault from a dosing valve, wiring or line fault before replacing components.
Assess conversion performance. If dosing is correct but an efficiency fault remains, follow the prescribed checks for exhaust leaks, NOx sensor plausibility, temperature, engine operation and the SCR catalyst. An instantaneous upstream/downstream comparison alone does not prove catalyst failure.
Repair and verify. Correct the identified cause, carry out any required priming, adaptation, coding or reset, and complete the manufacturer’s verification procedure or drive cycle. Confirm fault memory and warning status, including any countdown.
AdBlue lines may remain pressurised and some systems purge fluid after the ignition is switched off. Wait and depressurise only as the manufacturer directs before disconnecting anything. Exhaust parts can remain very hot after operation or regeneration. Use suitable eye and skin protection, ventilation and spill-cleaning procedures.
Fluid, filling and contamination
Use fresh, vehicle-approved AdBlue/DEF meeting the specification in the owner’s manual, from a clean, sealed or suitable dedicated dispenser. Do not dilute it, add additives or transfer it using containers previously used for fuel, oil or other chemicals. Follow the vehicle's instructions for filler location and refill quantity.
If AdBlue is put into the diesel fuel tank, or diesel is put into the AdBlue tank, do not switch on the ignition or start the engine. Arrange recovery or specialist help and follow the manufacturer’s contamination procedure; operating pumps can spread contamination. Do not assume a simple top-up or dilution is an adequate repair.
AdBlue can freeze in cold conditions. Freezing alone does not prove the tank or pump has failed: systems may have heaters and specific cold-weather operating strategies. If a warning persists after the prescribed conditions are met, test the heater, temperature sensor, supply and control circuit. Bosch describes a heated supply module as one example; arrangements differ by vehicle. Bosch supply module information.
Deposits, dosing and catalyst efficiency
White residue can indicate crystallised fluid from a leak or deposits near the dosing point, but visual appearance alone cannot identify the cause. Check fluid lines and fittings, dosing quantity and spray characteristics, exhaust temperature and any relevant service bulletin using approved methods. Do not scrape, soak or heat a dosing valve unless the manufacturer permits it.
An SCR efficiency fault can arise from sensor errors, exhaust leaks, incorrect fluid delivery, engine-out emissions or catalyst deterioration. Compare upstream and downstream NOx data only when the relevant sensors are ready and the vehicle-specific monitor conditions are satisfied. Use the manufacturer’s guided assessment rather than replacing a catalyst based on one scan-tool snapshot.
After repair
Use the correct components and seals, route lines and wiring as specified, and perform any manufacturer-required priming, leak check, software configuration or adaptation. Clear faults at the appropriate step and complete the required verification drive or stationary test with the prescribed safety measures. Confirm that the warning and countdown have cleared according to the vehicle procedure; do not bypass or disable emissions controls.
AdBlue pump diagnosis
The AdBlue pump supplies diesel exhaust fluid (DEF) from its tank to the SCR dosing system. A low-pressure or supply warning does not necessarily mean the pump has failed: low fluid, leaks, restrictions, contamination, freezing, a pressure-sensor fault or an electrical problem can produce similar results. Test the complete supply system before replacing the pump or tank.
Conceptual AdBlue supply layout. On some vehicles the pump, sensors and heater are integrated into the tank module. Original Tuning Wiki illustration by OpenAI Codex, commissioned for use on Tuning Wiki. Technical basis: Bosch Denoxtronic supply module.
Symptoms and first checks
Observation
What to investigate
SCR, AdBlue or engine warning
Save all engine and aftertreatment codes, freeze-frame data and operating conditions. Identify whether the fault concerns pressure, pump control, dosing, sensors or fluid quality.
Restart countdown or reduced performance
Follow the vehicle's instructions and arrange diagnosis promptly. A countdown can have several causes and may require a completed verification after repair.
Low reductant pressure or failed pressure build-up
Check fluid level and condition, leaks, restrictions, pump supply and command, pressure reading and prescribed priming before deciding the pump is faulty.
Warning after a refill or pump replacement
Check correct fluid, refill recognition, connections and the manufacturer's priming and leak-test procedure. Avoid applying another model's procedure.
Fault in cold weather
Check fluid temperature, thawing conditions, heater and control faults using vehicle data. Freezing alone does not prove the pump has failed.
White residue around a hose or pump
Inspect for a leak and identify its source. Residue can be dried fluid; appearance alone does not identify the failed part.
Warning and fallback strategies vary. HELLA describes pump-related pressure and contamination faults, while Bosch illustrates one integrated supply design.
What the pump does
The pump or supply module moves AdBlue from its separate tank to the dosing valve. The controller manages delivery and, depending on the design, monitors pressure and fluid temperature, level or quality. Some units combine the pump, heater, filter and sensors in or on the tank; other systems have separate serviceable components. Pressure control, return lines, purge strategy and available measurements differ by vehicle.
This pump handles reductant for exhaust aftertreatment. It is not the diesel lift pump or high-pressure fuel pump, and their pressures, fluids and test methods are not interchangeable.
Common causes of low-pressure and pump faults
Check the fluid path and electrical control together. Original Tuning Wiki illustration by OpenAI Codex, commissioned for use on Tuning Wiki.
Fluid condition: insufficient, incorrect or contaminated fluid can prevent correct operation or damage components. A concentration test alone may not detect all contamination.
Leaks and restriction: damaged seals, loose couplings, kinked or blocked lines, a restricted filter or a leaking dosing valve can prevent pressure build-up or retention.
Electrical or control faults: blown fuses, wiring damage, corrosion, poor power or ground, network faults or a control-module problem can stop the pump or distort its readings.
Pressure measurement: an inaccurate pressure sensor or circuit can report an implausible value even if actual pressure differs.
Cold-weather issues: frozen fluid, a heater or temperature-sensor fault, or insufficient thaw time can affect dosing when the manufacturer’s enabling conditions are not met.
Mechanical failure or deposits: wear, internal pump damage or deposits can impair the supply. Determine and correct the cause before installing a replacement.
Fault codes and warnings
P20E8 commonly indicates reductant pressure too low; P208B can indicate reductant pump control performance on some vehicles. Other codes concern the pump circuit, pressure sensor, heater, dosing valve, fluid quality or SCR efficiency. The complete manufacturer-specific code, suffix and test conditions matter: P20E8 identifies low pressure, not the failed part. A manufacturer bulletin for specified 6.7-litre vehicles lists both codes and a software-related remedy for its applicable fault conditions.
Practical diagnostic sequence
Record the complaint. Save all engine and aftertreatment codes, freeze-frame data and any warning or restart countdown. Note weather, recent refills, repairs and whether pressure was reported during an active test.
Identify the system. Obtain the exact tank and pump layout, wiring diagram, pressure measurement method, applicable bulletins and guided test for the vehicle. Check whether the pump, filter or pressure sensor is separately serviceable.
Inspect the fluid and installation. Confirm the specified fluid and level, and check the tank, lines, connectors and visible fittings for leaks, damage, kinks and contamination. Use an approved sample test where fluid quality is in doubt.
Make the system safe. Allow hot exhaust components to cool. AdBlue lines can remain pressurised and some systems purge after shutdown. Wait and depressurise using the manufacturer's procedure before disconnecting a line.
Review live data and test conditions. Check fluid temperature, level, commanded pump or pressure, measured pressure and related heater or dosing faults as supported. Confirm the diagnostic routine's prerequisites; an inactive pump at key-on is not automatically faulty.
Check electrical supply and control. Follow the wiring diagram to test fuses, voltage supply, grounds and communication at the correct module. Check voltage drop or control signals only under the stated conditions and with suitable equipment.
Run the prescribed pressure and leak test. Use the manufacturer's scan-tool routine and rated test equipment. Compare measured results with that vehicle's limits, and distinguish a real leak or restriction from an inaccurate pressure input. Do not apply a universal pressure value.
Isolate the cause. Follow the approved procedure to check the supply line, dosing valve, pump and pressure sensor. Do not deadhead the pump, apply external pressure or substitute test fluid unless the manufacturer explicitly directs it.
Repair, prime and verify. Repair the confirmed fault, fit correct seals and connections, perform any specified priming or adaptation and repeat the leak and pressure tests. Complete the required verification cycle and confirm codes, warnings and countdown status.
Use clean, dedicated equipment and suitable eye and skin protection. Keep DEF out of electrical connectors and follow the manufacturer's spill-cleaning and disposal instructions. Never disconnect a hot exhaust or a pressurised line, bypass system safeguards, or run an improvised external pump test.
Pressure, leaks and priming
Low reported pressure can result from a real delivery problem, a leak or an incorrect measurement. Check commanded and measured pressure during the prescribed routine and use an independent gauge only where the vehicle maker specifies a safe connection, pressure range and method. A pump that runs or makes a noise is not automatically delivering the required pressure or flow.
After opening the system or replacing a pump, some vehicles require a scan-tool priming routine. Conditions and repetitions are model-specific. A GM bulletin describes a low-pressure condition after pump or tank replacement for its affected vehicles; it explicitly does not present that procedure as an initial diagnosis for every low-pressure fault.
Freezing, purge and deposits
AdBlue can freeze in cold conditions. Some systems use tank and line heaters and wait for suitable temperature and operating conditions before dosing. A frozen system alone is not proof of a defective pump. Follow the vehicle's cold-weather diagnostic conditions before testing heater circuits or replacing parts; a Bosch supply module uses an integrated heater as one example.
Some systems purge fluid from the line after shutdown to reduce freeze-related risk; the timing and method vary. Interrupting an applicable purge or disconnecting the battery or lines prematurely can affect the system. Follow the manufacturer’s shutdown and depressurisation procedure. Dried fluid around a connection warrants inspection for a leak, while internal deposits or contamination require the specified repair and cleaning process.
Fluid contamination and incorrect filling
Use fresh, vehicle-approved AdBlue/DEF in clean dedicated equipment. Do not dilute it, add additives or transfer it with equipment used for fuel or oil. A refractometer checks concentration where specified but does not rule out every contaminant. If contamination is suspected, follow the manufacturer’s sampling and system-cleaning procedure rather than repeatedly priming a contaminated system.
If AdBlue is put into the diesel fuel tank, or diesel is put into the AdBlue tank, do not switch on the ignition or start the engine. Arrange specialist assistance and follow the vehicle manufacturer’s contamination procedure; pump operation can spread contamination.
Replacement and final checks
Use the correct pump or complete tank assembly for the vehicle, and replace seals, filters and lines only as prescribed. Keep fluid away from electrical connectors and route and secure the harness and lines as specified. Some vehicles need priming, sensor initialisation or other adaptation; others use a different procedure.
After repair, verify pressure build-up, retention and dosing with the manufacturer's tests, then complete the required monitor or driving cycle. Confirm the original fault, warnings and countdown are resolved. If pressure remains incorrect, recheck the fluid path, pressure measurement and electrical evidence rather than replacing further parts by guesswork.
AdBlue injector and dosing valve diagnosis
The AdBlue injector, also called a reductant dosing valve or doser, meters diesel exhaust fluid (DEF) into the exhaust ahead of an SCR catalyst. A dosing fault can be electrical, mechanical or caused by the fluid supply, its lines or the exhaust. Deposits and an SCR warning do not automatically mean the injector has failed: check the complete system and use the vehicle manufacturer's test procedure.
Conceptual dosing valve installation. Valve construction, cooling, wiring and exhaust layout vary. Original Tuning Wiki illustration by OpenAI Codex, commissioned for use on Tuning Wiki. Technical basis: Bosch Denoxtronic dosing module.
Symptoms and first checks
Observation
What to investigate
SCR, AdBlue or engine warning
Save all relevant codes and freeze-frame data. Identify whether the fault concerns the valve circuit, fluid supply, dosing performance, NOx sensors or SCR efficiency.
Restart countdown or reduced performance
Follow the vehicle's displayed instructions and arrange diagnosis promptly. A countdown can have several causes and may need a completed verification after repair.
White deposits around the injector or line
Identify whether residue is at the tip, a line connection or an exhaust joint. Inspect for leaks and assess deposits using the manufacturer's procedure.
Low or absent dosing
Check fluid quality, supply, pressure, valve command, wiring and the manufacturer-specified dosing test before replacing the valve.
Recurring SCR efficiency fault
Investigate dosing, sensor readiness, exhaust leaks, fluid quality and catalyst conditions. A single NOx or temperature snapshot is not enough to identify the cause.
Fault after exhaust or tank work
Check part and installation position, seals, connections, line routing and any required priming or adaptation.
How the dosing valve works
The SCR supply system delivers AdBlue to the dosing module. The controller operates the valve according to the vehicle's exhaust conditions and emissions strategy; the injected fluid forms ammonia that helps the SCR catalyst reduce nitrogen oxides. Dosing conditions, spray pattern and components differ, and some commercial-vehicle valves have cooling arrangements. This is an exhaust aftertreatment injector, not an engine fuel injector. Bosch describes the dosing module and its function.
Fluid supply pressure, temperature and dosing command need to be evaluated together. A valve may not be commanded to operate until the relevant conditions are met; a quiet valve at idle or with a cold exhaust is not automatically faulty.
Common causes of dosing faults
Check the supply and electrical control as well as the dosing valve and exhaust. Original Tuning Wiki illustration by OpenAI Codex, commissioned for use on Tuning Wiki.
Supply problems: low or contaminated fluid, a pump or pressure fault, blocked line, freezing or a leaking connection can affect delivery.
Electrical faults: damaged wires, loose terminals, corrosion, missing supply or control faults can prevent valve operation.
Valve or nozzle faults: leakage, damage, sticking or deposits may affect a dosing test. Confirm the result under the prescribed test conditions.
Exhaust or installation faults: damaged seals, an exhaust leak, incorrect mounting, wrong part, heat damage or restricted mixing can affect system performance.
Related sensor or catalyst faults: NOx sensors, temperature signals, the SCR catalyst or engine operation may cause an SCR warning even when dosing is correct.
White crystals: normal residue or a leak?
A small amount of crystallised DEF at a dosing tip can be normal on some systems. A Hino technical tip for specified trucks advises against replacing the injector for tip crystallisation alone. A Volvo truck diagnostic note likewise says minor crystals and a wet valve tip can be normal for the systems it covers. These examples do not establish a universal acceptance limit.
Residue at a supply-line connection may instead point to an external leak. A Volkswagen bulletin for affected vehicles identifies a line-connection leak where the prescribed repair concerns the line rather than the injector. Trace the exact source and follow the correct vehicle bulletin; do not diagnose from colour or deposits alone.
Fault codes and warnings
Codes may identify a reductant injector circuit, dosing performance, reductant pressure, fluid quality or SCR efficiency. P20E8 can indicate reductant pressure too low, while P20EE commonly indicates SCR NOx catalyst efficiency below threshold; neither alone proves an injector fault. See the Volkswagen technical tip and Audi diagnostic reference for examples scoped to their vehicles. Read the complete manufacturer-specific code, suffix, bank and test plan.
Practical diagnostic sequence
Record the complaint. Save all engine and aftertreatment codes, freeze-frame data and warning or countdown information. Note recent refills, exhaust work, sensor replacements and conditions when the fault appears.
Identify the system. Find the correct doser, supply and return arrangement if present, wiring, cooling and vehicle-specific test procedure. Some vehicles have more than one dosing point.
Make the system safe. Let hot exhaust components cool. The fluid system can remain pressurised and may purge after shutdown; wait and depressurise only as directed. Secure the vehicle and follow the prescribed workshop precautions.
Inspect the valve, line and exhaust. Check for damaged connectors, harness chafing, loose fittings, external leaks and deposits. Distinguish residue at the nozzle tip from leakage at a fluid fitting or an exhaust joint.
Check fluid and supply. Confirm the specified fluid and adequate level; if contamination is suspected, use the approved sampling procedure. Review pump operation, line condition and actual versus commanded pressure where supported.
Check electrical control. Use the vehicle wiring diagram and guided fault test for power, ground, control and any relevant communication. Do not apply battery voltage directly to an unidentified valve or probe unspecified pins.
Perform the approved dosing and leak test. Use the manufacturer's diagnostic routine, prescribed pressure, collection equipment and test conditions. Record quantity and response against the exact vehicle limits. Some tests include a purge or bleed phase; interpret leakage only during the phase and conditions defined by that procedure.
Investigate related faults. If supply and dosing pass, assess exhaust leaks, NOx and temperature sensor readiness, engine conditions and SCR efficiency using the specified diagnostic sequence.
Repair and verify. Repair the confirmed leak, circuit, supply or valve fault. Fit specified seals, complete required priming or adaptation, and carry out the prescribed leak check and verification drive or monitor test. Confirm warning and countdown status.
Use suitable eye and skin protection and clean, dedicated equipment for DEF. Never disconnect a hot exhaust or pressurised line, spray fluid towards a person, or run an improvised external dosing test. Follow the manufacturer's directions for ventilation, fluid disposal and fire precautions.
Dosing quantity, spray and leakage
A proper diagnostic test considers supply pressure, valve command, measured fluid quantity and the exact test phase. A result outside the specified quantity can be caused by fluid supply, a restriction, a leak or the valve itself; repeat or isolate tests only as the vehicle procedure instructs. Use the required graduated container and record the result rather than applying a value from another engine.
Some procedures also assess leakage or spray characteristics. A wet tip, a small amount released during a bleed or the appearance of a spray are meaningful only in the context of the specific test. The Volvo truck note illustrates why test phase and accurate quantity measurement matter; do not apply its values or criteria to other vehicles.
Cleaning, replacement and verification
Clean deposits only when the manufacturer approves the method for that component and location. Do not poke the nozzle, use aggressive solvents, scrape sealing surfaces, apply open flame or immerse electronics. If a valve or line must be replaced, use the correct part, new seals where specified and the required fitting torque and routing.
After repair, follow the exact priming, leak-check, coding or adaptation instructions. Complete the specified monitor or road test, check SCR data and fault memory, and confirm any restart warning is resolved according to the vehicle procedure. Do not disable emissions controls or clear faults repeatedly in place of a repair.