Tuning Wiki

This is a historical revision. Read the current page or return to its history.

Page organisation in this revision
Page type
Technical article
Subject
Diagnostics
Parent
Section level
Applies to
No ECU-specific applicability
Tool groups
None
Manufacturers
None

Changes from revision 3 to revision 6

Removed text is struck through; added text is highlighted.

A controlled propane enrichment test deliberately adds fuel vapour to a running petrol engine's intake while the technician watches the upstream lambda sensor. If the mixture at that sensor becomes rich, a conventional zirconia switching sensor should move to its high-voltage rich side. This is a response check, not a complete sensor or fuel-system diagnosis.

Safety and scope

Propane is highly flammable. This is a trained-technician workshop test: use a purpose-made, regulated propane enrichment device and follow its instructions and the vehicle manufacturer's procedure. Work in a well-ventilated area with suitable exhaust extraction; keep gas away from ignition sources, hot exhaust components and moving parts. Secure the vehicle, use a gas-tight connection and check for leaks. Never use an open flame or release gas into the workshop. Stop and shut off the gas immediately if there is a leak, backfire, misfire, unstable running or an unsafe condition. Avoid prolonged rich running, which can overheat or damage the catalyst. Do not use this procedure on a diesel engine.

Prepare the test
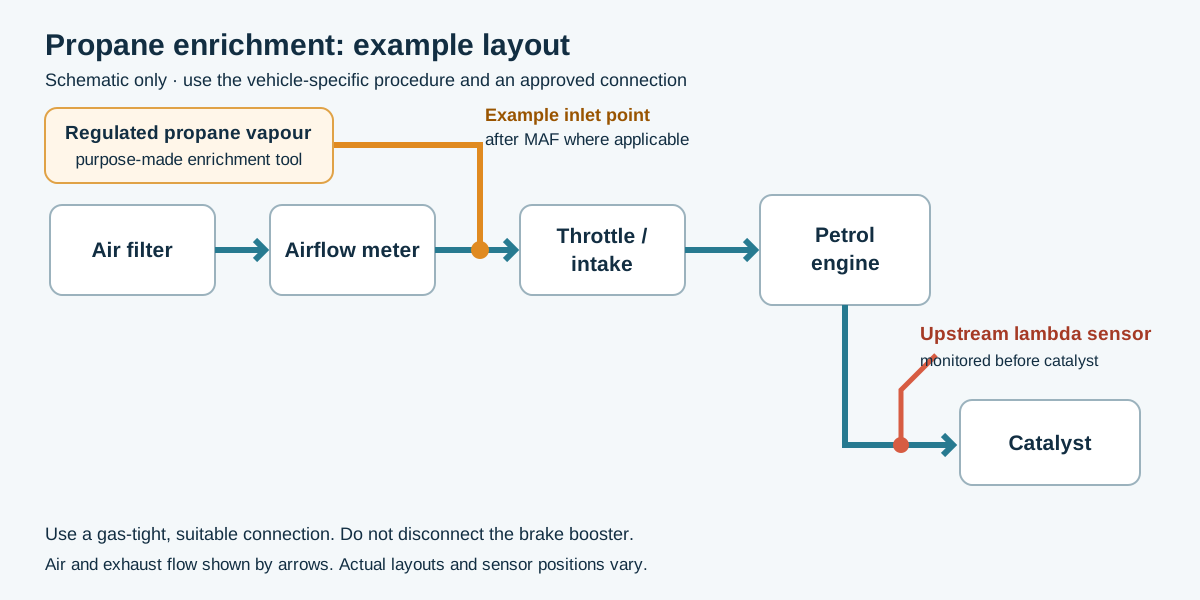
Example layout: introduce regulated propane vapour at a suitable approved intake point. The actual connection depends on the vehicle and test equipment. Diagram created for Tuning Wiki from the sources below; schematic, not a vehicle-specific installation.

Identify the engine, bank and upstream sensor, and confirm its type and the relevant manufacturer test method. Read fault codes and freeze-frame information; check for misfires, exhaust leaks and heater or wiring faults. Fix conditions that prevent a meaningful test. Connect a scan tool to graph the correct upstream sensor, fuel-system status and short-term fuel trim. For a conventional zirconia voltage sensor, an appropriately connected high-impedance oscilloscope gives a clearer, faster trace than a slow scan-tool display. Follow the wiring diagram; do not short or apply voltage to sensor circuits. Connect the enrichment device to a suitable intake point specified for the engine and tool, so controlled propane vapour enters the running engine. Where applicable introduce it downstream of the airflow meter; do not disconnect safety-critical brake booster lines. Follow the equipment instructions. Warm the engine and sensor fully and establish stable closed-loop idle, if applicable.

Introduce propane and watch the response

Illustrative trace for a conventional upstream zirconia switching sensor, not a recorded measurement or a wideband voltage specification. Actual timing varies; closed-loop compensation can return the signal to switching during enrichment. Diagram created for Tuning Wiki from the sources below.

Record the baseline sensor signal, fuel trim and operating state. With the engine running, gradually introduce a small, controlled amount of propane while observing the trace. The added fuel should drive the exhaust mixture toward rich; a hot upstream zirconia switching sensor typically moves toward about 0.8–0.9 V when sufficiently rich. Use the vehicle-specific limit, not this illustrative range, as the acceptance criterion. In closed loop the ECU may remove injected petrol in response, bringing the sensor back toward switching and short-term trim negative. A small addition may therefore be compensated before a sustained rich reading appears. If the vehicle and tool procedures permit, increase enrichment only as needed to obtain a clear rich response; do not keep adding gas to force an unstable engine. Shut off the propane promptly. Observe the sensor and trim return toward their previous behaviour as the system recovers. Close the cylinder and device valves, remove the equipment safely, restore and check all connections, and verify normal operation.

The published zirconia propane test example describes gradual enrichment and the ECU's ability to compensate. Its timings and limits are an example, not universal specifications. Pico: pre-cat zirconia output and heater explains rich and lean voltage behaviour.

How fuel trim can respondWith closed-loop control and the usual sign convention, added propane makes the mixture richer and the ECU may reduce injected petrol, moving short-term fuel trim negative. After propane is shut off, trim can rise, sometimes briefly overshooting, as the ECU adjusts again. Baseline, magnitude and timing vary; a brief test may not change long-term trim. Verify the vehicle’s trim convention and operating state. The trace is illustrative, not a measured recording or pass/fail limit. Diagram created for Tuning Wiki; see Fuel trims and the cited propane test example.

Interpreting the result

Moves rich: the sensor and its observed signal path respond to this disturbance. That alone does not prove accuracy, response time, heater condition, catalyst health or normal operation across the full range. Little or no rich response: first confirm that propane reached the relevant cylinders and made the exhaust genuinely rich, the correct bank and parameter are selected, the sensor is hot, and closed-loop correction has not masked the change. An intake distribution issue, misfire, exhaust leak, wiring, heater, sensor or measurement problem can affect the result. Use vehicle-specific checks before replacing parts. After the catalyst: a downstream sensor can respond more slowly because the catalyst stores oxygen. Do not apply an upstream response-time test to it or condemn a catalyst from this test alone.

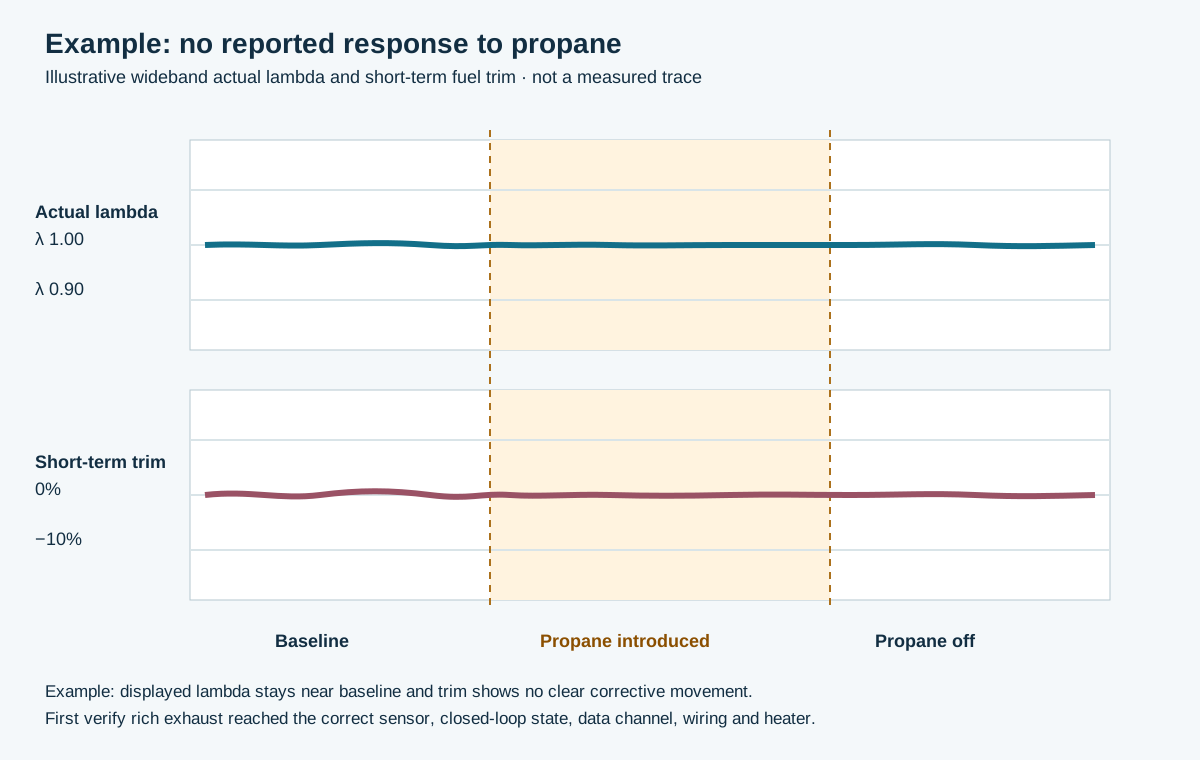
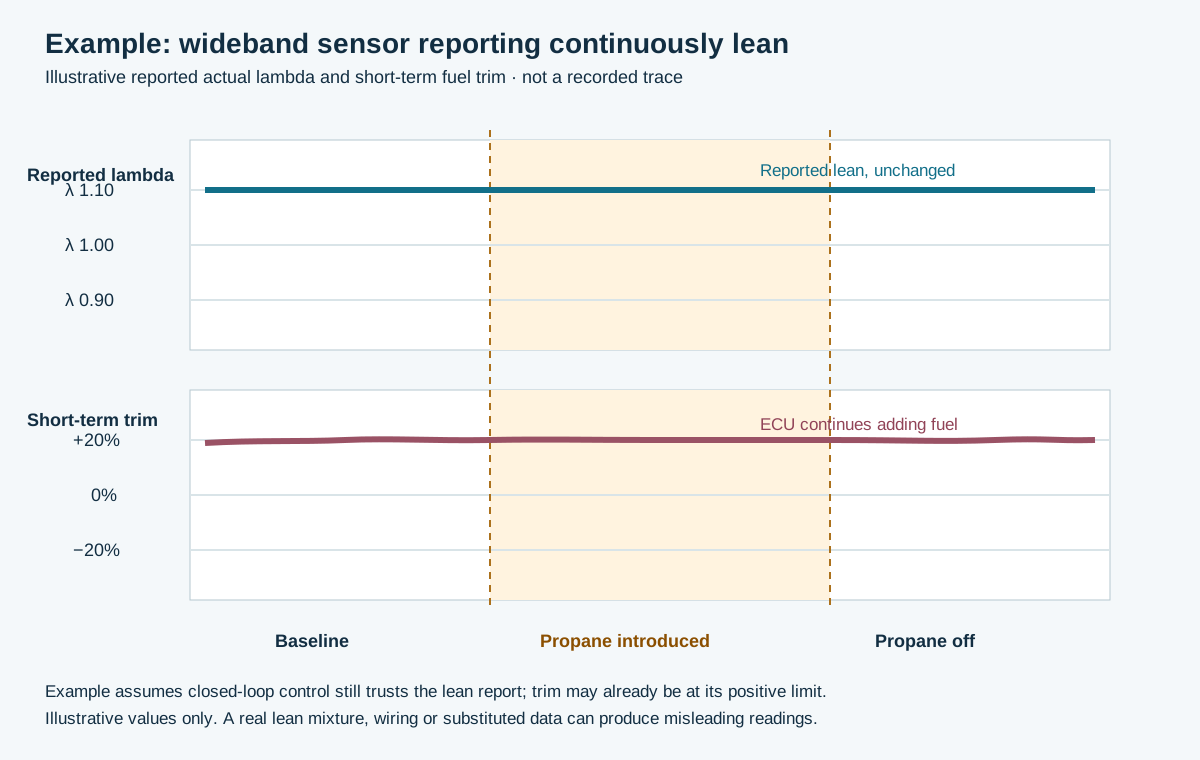
Example: no visible responseThis constructed example shows an actual-lambda display remaining near 1 and short-term trim showing no clear response, even though propane is introduced. It is one possible pattern, not a universal failed-sensor signature: a faulty sensor can be stuck at other readings, and trim may change for other reasons. Confirm that the exhaust at the correct sensor actually became rich, the correct bank and data channel are being observed, and the ECU is in a suitable closed-loop state. Check heater, wiring, exhaust leaks and the measurement path using the vehicle-specific procedure before condemning the sensor. A scan tool can show a substituted or filtered value; use the manufacturer’s circuit checks where appropriate. Diagram created for Tuning Wiki; see the sensor and test sources below.Example: sensor reporting lean continuouslyIn this constructed example, a wideband system continues reporting lean (lambda above 1) even when the exhaust at the sensor has been made rich. If the ECU remains in closed loop and trusts that report, it may continue adding petrol, giving a positive short-term trim; the correction may already have reached its limit. The ECU can instead detect a fault, substitute a value, suspend feedback or change operating mode, so trim need not stay positive. Baseline values, limits and timing are illustrative, not acceptance criteria. A conventional zirconia switching sensor stuck lean normally reports a low voltage, not a wideband lambda value.First verify that the correct bank and parameter are selected, the engine and sensor are warm, and the exhaust actually becomes rich at that sensor. A real lean mixture, misfire, exhaust leak, inadequate propane delivery, heater or wiring fault, or filtered or substituted scan data can also mislead. Follow vehicle-specific circuit and response tests before replacing a sensor; stop the test if running becomes unstable. Diagram created for Tuning Wiki; see the sensor and propane-test sources below.

Wideband and other sensors

This illustrative diagram shows actual lambda, not sensor-wire voltage or a measured waveform. The depth and timing of the rich response vary; closed-loop fuel correction may bring the reading back towards lambda 1 while propane is still being added. Diagram created for Tuning Wiki using the wideband sources cited below.

Wideband sensors require their ECU or dedicated controller. If the applicable manufacturer permits this disturbance, watch the correctly identified actual lambda or equivalence-ratio parameter: a genuinely rich mixture is lambda below 1, or equivalence ratio above 1. The display may be filtered, clamped or use a different scale. Do not apply the zirconia 0.8–0.9 V rule to a wideband signal or probe its pump-cell wiring as if it were a conventional switching sensor. Titania sensors also use different circuit behaviour. Consult the exact system's data. Pico: Bosch LSU 4.2 wideband testing; Fluke 98 manual, oxygen sensor testing.

See also Lambda sensors: operation, testing and diagnosis, Fuel trims and Fuelling faults.

Sources

Service manual reproduction: oxygen sensor testing using propane, a specific zirconia test example.Pico Technology: pre-cat zirconia sensor; Bosch LSU 4.2 test.HSE: vehicle exhaust emissions.

Rendered revisions

Open each version to inspect formatting, tables and photographs.

Revision 3: Testing a lambda sensor with propane enrichment

A controlled propane enrichment test deliberately adds fuel vapour to a running petrol engine's intake while the technician watches the upstream lambda sensor. If the mixture at that sensor becomes rich, a conventional zirconia switching sensor should move to its high-voltage rich side. This is a response check, not a complete sensor or fuel-system diagnosis.

Safety and scope

Propane is highly flammable. This is a trained-technician workshop test: use a purpose-made, regulated propane enrichment device and follow its instructions and the vehicle manufacturer's procedure. Work in a well-ventilated area with suitable exhaust extraction; keep gas away from ignition sources, hot exhaust components and moving parts. Secure the vehicle, use a gas-tight connection and check for leaks. Never use an open flame or release gas into the workshop. Stop and shut off the gas immediately if there is a leak, backfire, misfire, unstable running or an unsafe condition. Avoid prolonged rich running, which can overheat or damage the catalyst. Do not use this procedure on a diesel engine.

Prepare the test

Schematic showing a regulated propane enrichment tool connected at an example intake point after the airflow meter, with an upstream lambda sensor before the catalyst.

Example layout: introduce regulated propane vapour at a suitable approved intake point. The actual connection depends on the vehicle and test equipment. Diagram created for Tuning Wiki from the sources below; schematic, not a vehicle-specific installation.

  1. Identify the engine, bank and upstream sensor, and confirm its type and the relevant manufacturer test method. Read fault codes and freeze-frame information; check for misfires, exhaust leaks and heater or wiring faults. Fix conditions that prevent a meaningful test.
  2. Connect a scan tool to graph the correct upstream sensor, fuel-system status and short-term fuel trim. For a conventional zirconia voltage sensor, an appropriately connected high-impedance oscilloscope gives a clearer, faster trace than a slow scan-tool display. Follow the wiring diagram; do not short or apply voltage to sensor circuits.
  3. Connect the enrichment device to a suitable intake point specified for the engine and tool, so controlled propane vapour enters the running engine. Where applicable introduce it downstream of the airflow meter; do not disconnect safety-critical brake booster lines. Follow the equipment instructions. Warm the engine and sensor fully and establish stable closed-loop idle, if applicable.

Introduce propane and watch the response

Illustrative warm upstream zirconia sensor voltage switching at baseline, rising to the rich side during sufficient propane enrichment, then returning to switching after propane is shut off.

Illustrative trace for a conventional upstream zirconia switching sensor, not a recorded measurement or a wideband voltage specification. Actual timing varies; closed-loop compensation can return the signal to switching during enrichment. Diagram created for Tuning Wiki from the sources below.

  1. Record the baseline sensor signal, fuel trim and operating state. With the engine running, gradually introduce a small, controlled amount of propane while observing the trace. The added fuel should drive the exhaust mixture toward rich; a hot upstream zirconia switching sensor typically moves toward about 0.8–0.9 V when sufficiently rich. Use the vehicle-specific limit, not this illustrative range, as the acceptance criterion.
  2. In closed loop the ECU may remove injected petrol in response, bringing the sensor back toward switching and short-term trim negative. A small addition may therefore be compensated before a sustained rich reading appears. If the vehicle and tool procedures permit, increase enrichment only as needed to obtain a clear rich response; do not keep adding gas to force an unstable engine.
  3. Shut off the propane promptly. Observe the sensor and trim return toward their previous behaviour as the system recovers. Close the cylinder and device valves, remove the equipment safely, restore and check all connections, and verify normal operation.

The published zirconia propane test example describes gradual enrichment and the ECU's ability to compensate. Its timings and limits are an example, not universal specifications. Pico: pre-cat zirconia output and heater explains rich and lean voltage behaviour.

Interpreting the result

  • Moves rich: the sensor and its observed signal path respond to this disturbance. That alone does not prove accuracy, response time, heater condition, catalyst health or normal operation across the full range.
  • Little or no rich response: first confirm that propane reached the relevant cylinders and made the exhaust genuinely rich, the correct bank and parameter are selected, the sensor is hot, and closed-loop correction has not masked the change. An intake distribution issue, misfire, exhaust leak, wiring, heater, sensor or measurement problem can affect the result. Use vehicle-specific checks before replacing parts.
  • After the catalyst: a downstream sensor can respond more slowly because the catalyst stores oxygen. Do not apply an upstream response-time test to it or condemn a catalyst from this test alone.

Wideband and other sensors

Illustrative wideband actual lambda trace near 1 at baseline, falling below 1 as propane makes the mixture rich, then returning toward baseline after the propane is shut off.

This illustrative diagram shows actual lambda, not sensor-wire voltage or a measured waveform. The depth and timing of the rich response vary; closed-loop fuel correction may bring the reading back towards lambda 1 while propane is still being added. Diagram created for Tuning Wiki using the wideband sources cited below.

Wideband sensors require their ECU or dedicated controller. If the applicable manufacturer permits this disturbance, watch the correctly identified actual lambda or equivalence-ratio parameter: a genuinely rich mixture is lambda below 1, or equivalence ratio above 1. The display may be filtered, clamped or use a different scale. Do not apply the zirconia 0.8–0.9 V rule to a wideband signal or probe its pump-cell wiring as if it were a conventional switching sensor. Titania sensors also use different circuit behaviour. Consult the exact system's data. Pico: Bosch LSU 4.2 wideband testing; Fluke 98 manual, oxygen sensor testing.

See also Lambda sensors: operation, testing and diagnosis, Fuel trims and Fuelling faults.

Sources

Revision 6: Testing a lambda sensor with propane enrichment

A controlled propane enrichment test deliberately adds fuel vapour to a running petrol engine's intake while the technician watches the upstream lambda sensor. If the mixture at that sensor becomes rich, a conventional zirconia switching sensor should move to its high-voltage rich side. This is a response check, not a complete sensor or fuel-system diagnosis.

Safety and scope

Propane is highly flammable. This is a trained-technician workshop test: use a purpose-made, regulated propane enrichment device and follow its instructions and the vehicle manufacturer's procedure. Work in a well-ventilated area with suitable exhaust extraction; keep gas away from ignition sources, hot exhaust components and moving parts. Secure the vehicle, use a gas-tight connection and check for leaks. Never use an open flame or release gas into the workshop. Stop and shut off the gas immediately if there is a leak, backfire, misfire, unstable running or an unsafe condition. Avoid prolonged rich running, which can overheat or damage the catalyst. Do not use this procedure on a diesel engine.

Prepare the test

Schematic showing a regulated propane enrichment tool connected at an example intake point after the airflow meter, with an upstream lambda sensor before the catalyst.

Example layout: introduce regulated propane vapour at a suitable approved intake point. The actual connection depends on the vehicle and test equipment. Diagram created for Tuning Wiki from the sources below; schematic, not a vehicle-specific installation.

  1. Identify the engine, bank and upstream sensor, and confirm its type and the relevant manufacturer test method. Read fault codes and freeze-frame information; check for misfires, exhaust leaks and heater or wiring faults. Fix conditions that prevent a meaningful test.
  2. Connect a scan tool to graph the correct upstream sensor, fuel-system status and short-term fuel trim. For a conventional zirconia voltage sensor, an appropriately connected high-impedance oscilloscope gives a clearer, faster trace than a slow scan-tool display. Follow the wiring diagram; do not short or apply voltage to sensor circuits.
  3. Connect the enrichment device to a suitable intake point specified for the engine and tool, so controlled propane vapour enters the running engine. Where applicable introduce it downstream of the airflow meter; do not disconnect safety-critical brake booster lines. Follow the equipment instructions. Warm the engine and sensor fully and establish stable closed-loop idle, if applicable.

Introduce propane and watch the response

Illustrative warm upstream zirconia sensor voltage switching at baseline, rising to the rich side during sufficient propane enrichment, then returning to switching after propane is shut off.

Illustrative trace for a conventional upstream zirconia switching sensor, not a recorded measurement or a wideband voltage specification. Actual timing varies; closed-loop compensation can return the signal to switching during enrichment. Diagram created for Tuning Wiki from the sources below.

  1. Record the baseline sensor signal, fuel trim and operating state. With the engine running, gradually introduce a small, controlled amount of propane while observing the trace. The added fuel should drive the exhaust mixture toward rich; a hot upstream zirconia switching sensor typically moves toward about 0.8–0.9 V when sufficiently rich. Use the vehicle-specific limit, not this illustrative range, as the acceptance criterion.
  2. In closed loop the ECU may remove injected petrol in response, bringing the sensor back toward switching and short-term trim negative. A small addition may therefore be compensated before a sustained rich reading appears. If the vehicle and tool procedures permit, increase enrichment only as needed to obtain a clear rich response; do not keep adding gas to force an unstable engine.
  3. Shut off the propane promptly. Observe the sensor and trim return toward their previous behaviour as the system recovers. Close the cylinder and device valves, remove the equipment safely, restore and check all connections, and verify normal operation.

The published zirconia propane test example describes gradual enrichment and the ECU's ability to compensate. Its timings and limits are an example, not universal specifications. Pico: pre-cat zirconia output and heater explains rich and lean voltage behaviour.

How fuel trim can respond

Illustrative short-term fuel trim moving negative as propane is added, then rising and returning toward baseline after propane is shut off.

With closed-loop control and the usual sign convention, added propane makes the mixture richer and the ECU may reduce injected petrol, moving short-term fuel trim negative. After propane is shut off, trim can rise, sometimes briefly overshooting, as the ECU adjusts again. Baseline, magnitude and timing vary; a brief test may not change long-term trim. Verify the vehicle’s trim convention and operating state. The trace is illustrative, not a measured recording or pass/fail limit. Diagram created for Tuning Wiki; see Fuel trims and the cited propane test example.

Interpreting the result

  • Moves rich: the sensor and its observed signal path respond to this disturbance. That alone does not prove accuracy, response time, heater condition, catalyst health or normal operation across the full range.
  • Little or no rich response: first confirm that propane reached the relevant cylinders and made the exhaust genuinely rich, the correct bank and parameter are selected, the sensor is hot, and closed-loop correction has not masked the change. An intake distribution issue, misfire, exhaust leak, wiring, heater, sensor or measurement problem can affect the result. Use vehicle-specific checks before replacing parts.
  • After the catalyst: a downstream sensor can respond more slowly because the catalyst stores oxygen. Do not apply an upstream response-time test to it or condemn a catalyst from this test alone.

Example: no visible response

Illustrative wideband actual lambda and short-term fuel trim both remaining near their baseline during propane enrichment and after the gas is turned off.

This constructed example shows an actual-lambda display remaining near 1 and short-term trim showing no clear response, even though propane is introduced. It is one possible pattern, not a universal failed-sensor signature: a faulty sensor can be stuck at other readings, and trim may change for other reasons. Confirm that the exhaust at the correct sensor actually became rich, the correct bank and data channel are being observed, and the ECU is in a suitable closed-loop state. Check heater, wiring, exhaust leaks and the measurement path using the vehicle-specific procedure before condemning the sensor. A scan tool can show a substituted or filtered value; use the manufacturer’s circuit checks where appropriate. Diagram created for Tuning Wiki; see the sensor and test sources below.

Example: sensor reporting lean continuously

Illustrative wideband actual lambda stuck above 1 with short-term fuel trim remaining positive before, during and after propane enrichment.

In this constructed example, a wideband system continues reporting lean (lambda above 1) even when the exhaust at the sensor has been made rich. If the ECU remains in closed loop and trusts that report, it may continue adding petrol, giving a positive short-term trim; the correction may already have reached its limit. The ECU can instead detect a fault, substitute a value, suspend feedback or change operating mode, so trim need not stay positive. Baseline values, limits and timing are illustrative, not acceptance criteria. A conventional zirconia switching sensor stuck lean normally reports a low voltage, not a wideband lambda value.

First verify that the correct bank and parameter are selected, the engine and sensor are warm, and the exhaust actually becomes rich at that sensor. A real lean mixture, misfire, exhaust leak, inadequate propane delivery, heater or wiring fault, or filtered or substituted scan data can also mislead. Follow vehicle-specific circuit and response tests before replacing a sensor; stop the test if running becomes unstable. Diagram created for Tuning Wiki; see the sensor and propane-test sources below.

Wideband and other sensors

Illustrative wideband actual lambda trace near 1 at baseline, falling below 1 as propane makes the mixture rich, then returning toward baseline after the propane is shut off.

This illustrative diagram shows actual lambda, not sensor-wire voltage or a measured waveform. The depth and timing of the rich response vary; closed-loop fuel correction may bring the reading back towards lambda 1 while propane is still being added. Diagram created for Tuning Wiki using the wideband sources cited below.

Wideband sensors require their ECU or dedicated controller. If the applicable manufacturer permits this disturbance, watch the correctly identified actual lambda or equivalence-ratio parameter: a genuinely rich mixture is lambda below 1, or equivalence ratio above 1. The display may be filtered, clamped or use a different scale. Do not apply the zirconia 0.8–0.9 V rule to a wideband signal or probe its pump-cell wiring as if it were a conventional switching sensor. Titania sensors also use different circuit behaviour. Consult the exact system's data. Pico: Bosch LSU 4.2 wideband testing; Fluke 98 manual, oxygen sensor testing.

See also Lambda sensors: operation, testing and diagnosis, Fuel trims and Fuelling faults.

Sources