Removed text is struck through; added text is highlighted.
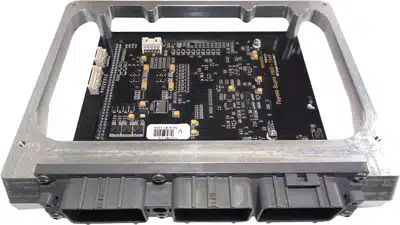
Vi-PEC iSupra i-Series plug-in ECU shown as a family illustration; this V-Series model's board, enclosure and vehicle connectors differ. Image: Link Engine Management Vi-PEC product archive, reproduced with permission.
Vi-PEC V Series Mitsubishi EVO 9 is a V Series plug-in ECU documented for Mitsubishi Lancer EVO 9. It is a vehicle-specific replacement board, and the precise model year, engine, ECU connector and market variant must be checked against the installation guide. Link's Vi-PEC manual index.
Installation and pin functions
Use the specific Vi-PEC installation manual for this application. Its installation instructions and pin-function sections identify connections and application differences; a similarly named V Series plug-in board for another vehicle must not be used as a wiring reference. Check the original ECU part number and wiring before fitting.
Programming and support
Link lists Vi-PEC Tuning Software (VTS) for the V Series. Firmware compatibility and the calibration depend on the ECU version. Consult the software archive and retain the original calibration before any change.
Identification limits
This page is indexed by the documented application rather than an independently verified manufacturer SKU. Check the manual for exact compatibility and do not infer additional vehicle fitments.
Manufacturer pinout tables
All positions listed in the application-specific Vi-PEC installation guide, page 22, are shown below. The drawing uses a view looking into the ECU from the wire side. Positions omitted by the source are not assumed unused; configure the channels for the vehicle. The guide repeats Aux–Ign 4 at pins 30 and 31 and Aux 3 at pins 41 and 63; verify the loom and configuration.
PositionECU functionExpansion 1Signal GroundExpansion 2+5V OutExpansion 3DI 9Expansion 4DI 10Expansion 5An Volt 6Expansion 6An Volt 7Expansion 7An Volt 8Expansion 8An Temp 4
Rendered revisions
Open each version to inspect formatting, tables and photographs.
Revision 2: Vi-PEC V Series Mitsubishi EVO 9
Vi-PEC V Series Mitsubishi EVO 9 is a V Series plug-in ECU documented for Mitsubishi Lancer EVO 9. It is a vehicle-specific replacement board, and the precise model year, engine, ECU connector and market variant must be checked against the installation guide. Link's Vi-PEC manual index.
Installation and pin functions
Use the specific Vi-PEC installation manual for this application. Its installation instructions and pin-function sections identify connections and application differences; a similarly named V Series plug-in board for another vehicle must not be used as a wiring reference. Check the original ECU part number and wiring before fitting.
Programming and support
Link lists Vi-PEC Tuning Software (VTS) for the V Series. Firmware compatibility and the calibration depend on the ECU version. Consult the software archive and retain the original calibration before any change.
Identification limits
This page is indexed by the documented application rather than an independently verified manufacturer SKU. Check the manual for exact compatibility and do not infer additional vehicle fitments.
Manufacturer pinout tables
All positions listed in the application-specific Vi-PEC installation guide, page 22, are shown below. The drawing uses a view looking into the ECU from the wire side. Positions omitted by the source are not assumed unused; configure the channels for the vehicle. The guide repeats Aux–Ign 4 at pins 30 and 31 and Aux 3 at pins 41 and 63; verify the loom and configuration.
Main ECU connector: documented positions
Position
ECU function
1
Injection 1
56
Aux – Inj 7
2
Injection 4
57
Aux – Inj 8
3
Aux – Ign 5
61
An Volt 2
4
Aux – Ign 6
62
An Temp 3
6
Aux – Ign 7
63
Aux 3
9
Injection 2
66
DI 2
11
Ignition Cyls 1 and 4
67
DI 7
12
Ignition Cyls 2 and 3
68
DI 5
14
Aux 8
71
An Volt 4
15
Aux 5
78
An Volt 3
18
Aux 1
80
DI 3
20
Aux – Inj 5
83
DI 4
21
Aux – Ign 3
88
DI 8
22
Aux – Inj 6
90
Aux – Ign 8
24
Injection 3
91
Knock 1
28
Aux 7
92
An Volt 1
47
+14V Main Relay
96
An Temp 2
29
Aux 6
99
DI 6
30
Aux – Ign 4
46
Ground
31
Aux – Ign 4
32
Aux 2
41
Aux 3
43
Trig 1
44
An Temp 1
50
Trig 2
53
DI 1
54
An Volt 5
55
Aux 4
Other connections
Position
ECU function
Expansion 1
Signal Ground
Expansion 2
+5V Out
Expansion 3
DI 9
Expansion 4
DI 10
Expansion 5
An Volt 6
Expansion 6
An Volt 7
Expansion 7
An Volt 8
Expansion 8
An Temp 4
Revision 3: Vi-PEC V Series Mitsubishi EVO 9Vi-PEC iSupra i-Series plug-in ECU shown as a family illustration; this V-Series model's board, enclosure and vehicle connectors differ. Image: Link Engine Management Vi-PEC product archive, reproduced with permission.
Vi-PEC V Series Mitsubishi EVO 9 is a V Series plug-in ECU documented for Mitsubishi Lancer EVO 9. It is a vehicle-specific replacement board, and the precise model year, engine, ECU connector and market variant must be checked against the installation guide. Link's Vi-PEC manual index.
Installation and pin functions
Use the specific Vi-PEC installation manual for this application. Its installation instructions and pin-function sections identify connections and application differences; a similarly named V Series plug-in board for another vehicle must not be used as a wiring reference. Check the original ECU part number and wiring before fitting.
Programming and support
Link lists Vi-PEC Tuning Software (VTS) for the V Series. Firmware compatibility and the calibration depend on the ECU version. Consult the software archive and retain the original calibration before any change.
Identification limits
This page is indexed by the documented application rather than an independently verified manufacturer SKU. Check the manual for exact compatibility and do not infer additional vehicle fitments.
Manufacturer pinout tables
All positions listed in the application-specific Vi-PEC installation guide, page 22, are shown below. The drawing uses a view looking into the ECU from the wire side. Positions omitted by the source are not assumed unused; configure the channels for the vehicle. The guide repeats Aux–Ign 4 at pins 30 and 31 and Aux 3 at pins 41 and 63; verify the loom and configuration.