Removed text is struck through; added text is highlighted.
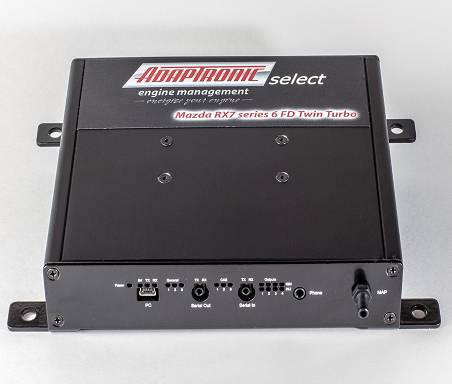
Adaptronic eSel021 is a Select-series vehicle plug-in programmable engine-management ECU. The surviving manufacturer guide identifies the intended application as Mazda RX-7 FD Series 6 13B REW twin turbo. Adaptronic eSel021 application and installation guide.
Identification and application
Confirm the case label and part number, original ECU and loom connector, engine, market and any vehicle-specific equipment against the guide before purchase or installation. Vehicle wiring can vary, and a shared plug shape does not establish pin compatibility.
Software and installation
The Select family uses Adaptronic WARI software, which is listed in Haltech’s legacy Adaptronic downloads archive. Use the matching eSel021 guide and application-specific basemap; the guide documents installation, configuration and pin references. A plug-in ECU still requires configuration and tuning for the actual engine and equipment.
Wiring and pinout
The manufacturer eSel021 guide contains the model and application-specific connector information. Positions and functions can change by application, and factory function and Adaptronic function are separate columns in the guide. The manufacturer connector table is transcribed below; verify the source and viewpoint before use.
A structured pin index with a redrawn connector face is in Adaptronic eSel021 connector pinout.
Support and sources
Haltech states that Adaptronic operations ended in 2022. Refer to its Adaptronic notice and archived guides, and confirm current support and compatibility for used hardware. A verified product photograph for this exact part has not yet been added.
Adaptronic manufacturer index
Manufacturer connector table
Transcribed from the model-specific Adaptronic installation guide linked above. The guide gives pin numbering from the loom side of the plug, looking into the ECU. A dash denotes a blank source cell. The source says NC is no connection in the factory loom and an empty Adaptronic column means no connection to the Adaptronic ECU. The first column includes the factory wire colour where documented.
Factory pin / colourFactory functionAdaptronic functionInstallation notes4Z LgInjector (Rear Secondary)Injector Output 4—4Y Lg/BInjector (Rear Primary)Injector Output 3—4X Lg/WInjector (Front Secondary)Injector Output 2—4W Lg/RInjector (Front Primary)Injector Output 1—4V L/YTurbo Pre Control Solenoid ValveAux Output 1—4U L/WWastegate Control Solenoid ValveAux Output 3—4T L/BCharge Control Solenoid ValveCharge Control Valve OutputInverse of 4R and 4S.4S PCharge Relief Solenoid ValveAux Output 4Linked to 4R.4R Y/LTurbo Control Solenoid ValveAux Output 4Linked to 4S.4Q L/GIdle Control Solenoid ValveAux Output 2—4PAWS Solenoid Valve——4O L/YEGR Solenoid Valve——4N L/RSecondary Air Switch ValvePGND—4M L/OPRC Solenoid Valve——4L B/YOil Metering Pump 1 barAux Output 7 barInverse of 4J.4K B/LgOil Metering Pump 2 barAux Output 8 barInverse of 4I.4J B/LOil Metering Pump 1Aux Output 7—4I B/OOil Metering Pump 2Aux Output 8—4H RCrankshaft Sensor -veSGND—4G WCrank Pos Sensor G (1 tooth) +veCAS 2 input—4F B/RSplit Air Bypass Solenoid Valve——4E BCrank Pos Sensor NE (12 tooth) +veCAS 1 input—4D Br/BSensor GroundSGND—4C BChassis GroundPGND—4B B/WChassis GroundPGND—4A B/WChassis GroundPGND—3P Y/RSecondary Air Bypass Valve——3O B/RDouble Throttle Solenoid Valve—Left open in the documented three-throttle setup.3N LPort Air Bypass Solenoid Valve——3M WKnock SensorKnock input—3L GIntake Air Temperature SenorMAT input—3K G/ORelief 2 Solenoid Valve——3J L/GEGR Function Sensor——3I Br/WTPS, MAP, MOP 5VTPS 5V—3H G/YPurge Solenoid Valve——3G B/GTPS Full RangeTPS signal input—3F G/RTPS Narrow Range——3E G/WCoolant Temp SensorECT—3D W/LCooling Fan RelayAux Output 6—3C BOxygen Sensor InputO2 signal Input—3B YElectrical LoadDigital Input 8—3A G/BMetering Oil Pump position sensorExt In—2L W/GGear 2 detectionDigital Input 7Optional digital input for boost or launch control.2K V/WGear 1 detectionDigital Input 6Optional digital input for boost or launch control.2J GyAir Pump Relay——2I O/LHeat Hazard Sensor——2H—SVSS2Optional front-right wheel speed.2G Lg/RAuto Transmission——2F BShorted to ground on Canadian carsSVSS1Optional front-left speed or flex fuel.2E O/BAuto Transmission——2D Y/GAuto Transmission——2C LAuto Transmission——2B Y/LTachometer outputTacho OutCombined trailing-ignition 1 and 2 outputs.2A—MVSS2 inputOptional rear-right speed or flex fuel.1V(V)———1U(U) LFuel Thermo SensorAux TempOptional temperature logging input; not used for tuning.1T(T) L/RFuel Pump RelayAux Output 5—1S(S) GStoplight SwitchDigital Input 5Optional digital input for boost or launch control.1R(R) G/WNeutral SwitchDigital Input 2—1Q(Q) L/OClutch SwitchDigital Input 1—1P(P)———1O(O) G/YMAP Sensor signalMAP signal input—1N(N) L/YSteering Pressure SensorDigital Input 3—1M(M) G/RSpeedometerMVSS1Optional rear-left wheel speed.1L(L) Y/BA/C RelayAC Relay Output—1K(K) L/WFuel Pump Relay (Speed)PGND—1J(J) Br/BIgniter Trailing RearIgniter Output 3—1I(I) Lg/YData Link ConnectorIgniter Output 4Optional rotor 2 leading ignition; diagnostic light-green/yellow wire; sacrifices pre-control output.1H(H) LgIgniter LeadingIgniter Output 1Direct-fire conversion: rotor 1 leading.1G(G) BrIgniter Trailing FrontIgniter Output 2—1F(F) W/BData Link Connector——1E(E) WRefrigerant Pressure SwitchDigital Input 4—1D(D) W/RData Link ConnectorCAS 3, for flex fuelDiagnostic white/red wire.1C(C) B/RPark/Neutral Switch (AT) / starter——1B(B) B/WMain Relay+12 Ignition—1A(A) L/RConstant PowerConst 12VFused battery supply.
Manufacturer photographAdaptronic eSel021 ECU pictured in its manufacturer installation guide, page 1; reproduced with permission.
Rendered revisions
Open each version to inspect formatting, tables and photographs.
Revision 4: Adaptronic eSel021
Adaptronic eSel021 is a Select-series vehicle plug-in programmable engine-management ECU. The surviving manufacturer guide identifies the intended application as Mazda RX-7 FD Series 6 13B REW twin turbo. Adaptronic eSel021 application and installation guide.
Identification and application
Confirm the case label and part number, original ECU and loom connector, engine, market and any vehicle-specific equipment against the guide before purchase or installation. Vehicle wiring can vary, and a shared plug shape does not establish pin compatibility.
Software and installation
The Select family uses Adaptronic WARI software, which is listed in Haltech’s legacy Adaptronic downloads archive. Use the matching eSel021 guide and application-specific basemap; the guide documents installation, configuration and pin references. A plug-in ECU still requires configuration and tuning for the actual engine and equipment.
Wiring and pinout
The manufacturer eSel021 guide contains the model and application-specific connector information. Positions and functions can change by application, and factory function and Adaptronic function are separate columns in the guide. The manufacturer connector table is transcribed below; verify the source and viewpoint before use.
Support and sources
Haltech states that Adaptronic operations ended in 2022. Refer to its Adaptronic notice and archived guides, and confirm current support and compatibility for used hardware. A verified product photograph for this exact part has not yet been added.
Transcribed from the model-specific Adaptronic installation guide linked above. The guide gives pin numbering from the loom side of the plug, looking into the ECU. A dash denotes a blank source cell. The source says NC is no connection in the factory loom and an empty Adaptronic column means no connection to the Adaptronic ECU. The first column includes the factory wire colour where documented.
Factory pin / colour
Factory function
Adaptronic function
Installation notes
4Z Lg
Injector (Rear Secondary)
Injector Output 4
—
4Y Lg/B
Injector (Rear Primary)
Injector Output 3
—
4X Lg/W
Injector (Front Secondary)
Injector Output 2
—
4W Lg/R
Injector (Front Primary)
Injector Output 1
—
4V L/Y
Turbo Pre Control Solenoid Valve
Aux Output 1
—
4U L/W
Wastegate Control Solenoid Valve
Aux Output 3
—
4T L/B
Charge Control Solenoid Valve
Charge Control Valve Output
Inverse of 4R and 4S.
4S P
Charge Relief Solenoid Valve
Aux Output 4
Linked to 4R.
4R Y/L
Turbo Control Solenoid Valve
Aux Output 4
Linked to 4S.
4Q L/G
Idle Control Solenoid Valve
Aux Output 2
—
4P
AWS Solenoid Valve
—
—
4O L/Y
EGR Solenoid Valve
—
—
4N L/R
Secondary Air Switch Valve
PGND
—
4M L/O
PRC Solenoid Valve
—
—
4L B/Y
Oil Metering Pump 1 bar
Aux Output 7 bar
Inverse of 4J.
4K B/Lg
Oil Metering Pump 2 bar
Aux Output 8 bar
Inverse of 4I.
4J B/L
Oil Metering Pump 1
Aux Output 7
—
4I B/O
Oil Metering Pump 2
Aux Output 8
—
4H R
Crankshaft Sensor -ve
SGND
—
4G W
Crank Pos Sensor G (1 tooth) +ve
CAS 2 input
—
4F B/R
Split Air Bypass Solenoid Valve
—
—
4E B
Crank Pos Sensor NE (12 tooth) +ve
CAS 1 input
—
4D Br/B
Sensor Ground
SGND
—
4C B
Chassis Ground
PGND
—
4B B/W
Chassis Ground
PGND
—
4A B/W
Chassis Ground
PGND
—
3P Y/R
Secondary Air Bypass Valve
—
—
3O B/R
Double Throttle Solenoid Valve
—
Left open in the documented three-throttle setup.
3N L
Port Air Bypass Solenoid Valve
—
—
3M W
Knock Sensor
Knock input
—
3L G
Intake Air Temperature Senor
MAT input
—
3K G/O
Relief 2 Solenoid Valve
—
—
3J L/G
EGR Function Sensor
—
—
3I Br/W
TPS, MAP, MOP 5V
TPS 5V
—
3H G/Y
Purge Solenoid Valve
—
—
3G B/G
TPS Full Range
TPS signal input
—
3F G/R
TPS Narrow Range
—
—
3E G/W
Coolant Temp Sensor
ECT
—
3D W/L
Cooling Fan Relay
Aux Output 6
—
3C B
Oxygen Sensor Input
O2 signal Input
—
3B Y
Electrical Load
Digital Input 8
—
3A G/B
Metering Oil Pump position sensor
Ext In
—
2L W/G
Gear 2 detection
Digital Input 7
Optional digital input for boost or launch control.
2K V/W
Gear 1 detection
Digital Input 6
Optional digital input for boost or launch control.
2J Gy
Air Pump Relay
—
—
2I O/L
Heat Hazard Sensor
—
—
2H
—
SVSS2
Optional front-right wheel speed.
2G Lg/R
Auto Transmission
—
—
2F B
Shorted to ground on Canadian cars
SVSS1
Optional front-left speed or flex fuel.
2E O/B
Auto Transmission
—
—
2D Y/G
Auto Transmission
—
—
2C L
Auto Transmission
—
—
2B Y/L
Tachometer output
Tacho Out
Combined trailing-ignition 1 and 2 outputs.
2A
—
MVSS2 input
Optional rear-right speed or flex fuel.
1V(V)
—
—
—
1U(U) L
Fuel Thermo Sensor
Aux Temp
Optional temperature logging input; not used for tuning.
1T(T) L/R
Fuel Pump Relay
Aux Output 5
—
1S(S) G
Stoplight Switch
Digital Input 5
Optional digital input for boost or launch control.
Adaptronic eSel021 is a Select-series vehicle plug-in programmable engine-management ECU. The surviving manufacturer guide identifies the intended application as Mazda RX-7 FD Series 6 13B REW twin turbo. Adaptronic eSel021 application and installation guide.
Identification and application
Confirm the case label and part number, original ECU and loom connector, engine, market and any vehicle-specific equipment against the guide before purchase or installation. Vehicle wiring can vary, and a shared plug shape does not establish pin compatibility.
Software and installation
The Select family uses Adaptronic WARI software, which is listed in Haltech’s legacy Adaptronic downloads archive. Use the matching eSel021 guide and application-specific basemap; the guide documents installation, configuration and pin references. A plug-in ECU still requires configuration and tuning for the actual engine and equipment.
Wiring and pinout
The manufacturer eSel021 guide contains the model and application-specific connector information. Positions and functions can change by application, and factory function and Adaptronic function are separate columns in the guide. The manufacturer connector table is transcribed below; verify the source and viewpoint before use.
Haltech states that Adaptronic operations ended in 2022. Refer to its Adaptronic notice and archived guides, and confirm current support and compatibility for used hardware. A verified product photograph for this exact part has not yet been added.
Transcribed from the model-specific Adaptronic installation guide linked above. The guide gives pin numbering from the loom side of the plug, looking into the ECU. A dash denotes a blank source cell. The source says NC is no connection in the factory loom and an empty Adaptronic column means no connection to the Adaptronic ECU. The first column includes the factory wire colour where documented.
Factory pin / colour
Factory function
Adaptronic function
Installation notes
4Z Lg
Injector (Rear Secondary)
Injector Output 4
—
4Y Lg/B
Injector (Rear Primary)
Injector Output 3
—
4X Lg/W
Injector (Front Secondary)
Injector Output 2
—
4W Lg/R
Injector (Front Primary)
Injector Output 1
—
4V L/Y
Turbo Pre Control Solenoid Valve
Aux Output 1
—
4U L/W
Wastegate Control Solenoid Valve
Aux Output 3
—
4T L/B
Charge Control Solenoid Valve
Charge Control Valve Output
Inverse of 4R and 4S.
4S P
Charge Relief Solenoid Valve
Aux Output 4
Linked to 4R.
4R Y/L
Turbo Control Solenoid Valve
Aux Output 4
Linked to 4S.
4Q L/G
Idle Control Solenoid Valve
Aux Output 2
—
4P
AWS Solenoid Valve
—
—
4O L/Y
EGR Solenoid Valve
—
—
4N L/R
Secondary Air Switch Valve
PGND
—
4M L/O
PRC Solenoid Valve
—
—
4L B/Y
Oil Metering Pump 1 bar
Aux Output 7 bar
Inverse of 4J.
4K B/Lg
Oil Metering Pump 2 bar
Aux Output 8 bar
Inverse of 4I.
4J B/L
Oil Metering Pump 1
Aux Output 7
—
4I B/O
Oil Metering Pump 2
Aux Output 8
—
4H R
Crankshaft Sensor -ve
SGND
—
4G W
Crank Pos Sensor G (1 tooth) +ve
CAS 2 input
—
4F B/R
Split Air Bypass Solenoid Valve
—
—
4E B
Crank Pos Sensor NE (12 tooth) +ve
CAS 1 input
—
4D Br/B
Sensor Ground
SGND
—
4C B
Chassis Ground
PGND
—
4B B/W
Chassis Ground
PGND
—
4A B/W
Chassis Ground
PGND
—
3P Y/R
Secondary Air Bypass Valve
—
—
3O B/R
Double Throttle Solenoid Valve
—
Left open in the documented three-throttle setup.
3N L
Port Air Bypass Solenoid Valve
—
—
3M W
Knock Sensor
Knock input
—
3L G
Intake Air Temperature Senor
MAT input
—
3K G/O
Relief 2 Solenoid Valve
—
—
3J L/G
EGR Function Sensor
—
—
3I Br/W
TPS, MAP, MOP 5V
TPS 5V
—
3H G/Y
Purge Solenoid Valve
—
—
3G B/G
TPS Full Range
TPS signal input
—
3F G/R
TPS Narrow Range
—
—
3E G/W
Coolant Temp Sensor
ECT
—
3D W/L
Cooling Fan Relay
Aux Output 6
—
3C B
Oxygen Sensor Input
O2 signal Input
—
3B Y
Electrical Load
Digital Input 8
—
3A G/B
Metering Oil Pump position sensor
Ext In
—
2L W/G
Gear 2 detection
Digital Input 7
Optional digital input for boost or launch control.
2K V/W
Gear 1 detection
Digital Input 6
Optional digital input for boost or launch control.
2J Gy
Air Pump Relay
—
—
2I O/L
Heat Hazard Sensor
—
—
2H
—
SVSS2
Optional front-right wheel speed.
2G Lg/R
Auto Transmission
—
—
2F B
Shorted to ground on Canadian cars
SVSS1
Optional front-left speed or flex fuel.
2E O/B
Auto Transmission
—
—
2D Y/G
Auto Transmission
—
—
2C L
Auto Transmission
—
—
2B Y/L
Tachometer output
Tacho Out
Combined trailing-ignition 1 and 2 outputs.
2A
—
MVSS2 input
Optional rear-right speed or flex fuel.
1V(V)
—
—
—
1U(U) L
Fuel Thermo Sensor
Aux Temp
Optional temperature logging input; not used for tuning.
1T(T) L/R
Fuel Pump Relay
Aux Output 5
—
1S(S) G
Stoplight Switch
Digital Input 5
Optional digital input for boost or launch control.