This STAR tester is a combined fast-code and slow-code reader for Ford EEC-IV/EFI. The module under test is Ford EEC-IV. The reader has its own memory, so the display does not have to be watched while the codes are coming in. Workshop manuals for the individual vehicle are written in slow codes. Fast codes are one hundred times faster than slow codes, and the fast/slow switch stays in the slow position for every procedure on this page.
The notes describe the self-test as more detailed than earlier EEC-IV self-tests, because this module’s self-test is more capable. They do not list model years. Run the three sequences in order, and finish each one, including any repair it calls for, before starting the next: engine off, then continuous codes, then engine running. That order is how the notes say a fault in the system is found.
Selecting the mode
Switch the ignition off before selecting the mode. Put the square red switch in HOLD, then switch the tester on. The display shows 88 for a moment and then settles on 00.
With the square red switch moved to TEST, the display shows :00. With the slider on the right-hand side moved to FAST as well, the display shows -:00. Once that self-check has finished, the tester is ready to use.
The three procedures do not use the FAST position. They name a 2-digit button, a Slow button and a MEM/TEST button. Pressing those leaves the TEST symbol on the display, which means the reader will accept codes from the module. The mode section names the square red HOLD/TEST switch; the procedures name MEM/TEST. Both names are kept here, because the notes use both and do not say they are the same control.
Memory
The tester stores every code it receives. After the self-test the codes remain until the tester is switched off, or until the square red switch is released and then put back to TEST. Either of those clears the memory. Switching off always erases it.
To read what was stored, release the square red switch and press MR, memory recall. Each press shows one code, in the order the codes arrived, and the first one shown is 00. When the last stored code has been shown, the next press starts the list again from the beginning. It will keep repeating until the tester is switched off.
Low battery
LO BAT on the display means the internal battery is low. Stop. Switch off the vehicle and switch off the tester. Fit a new internal 9 V battery and repeat the test from the beginning. Do not keep going with LO BAT showing. If it appears during a procedure, the whole self-test is repeated after the battery is changed, not just the step that was in progress.
Connection and adaptors
The tester joins the car with its cable on its own, or with the cable plus adaptor 0133230 or adaptor 0133231. Which adaptor is used depends on the car model and the model year. US vehicles use a further adaptor, tool number 2907.
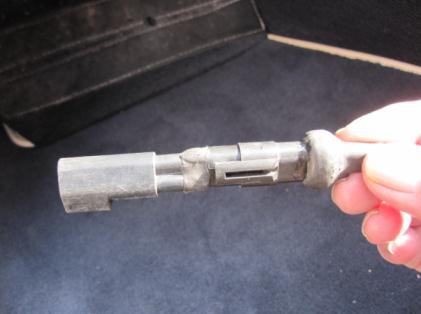
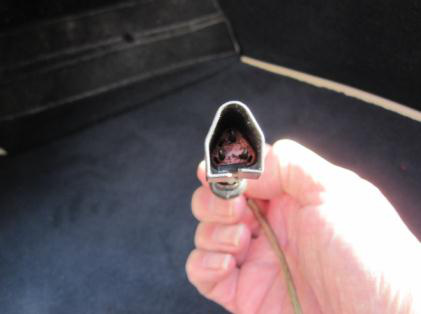
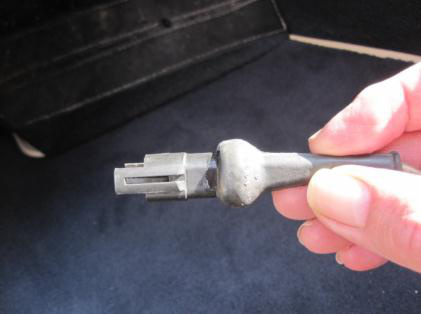
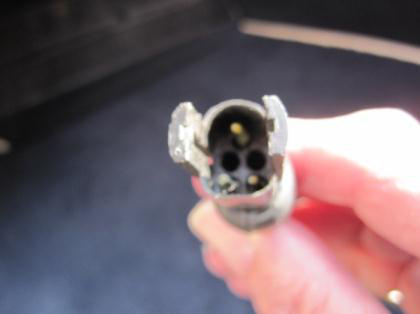
On the car, the self-test output is a three-pin plug in the loom near the ECU, normally in the wiring under the glovebox. The reader carries two connectors because at least two different plugs were fitted. Confirm which plug is diagnostics by the wire colours before connecting. The diagnostics wires are brown, brown/green and blue/green.
Later cars, type 1
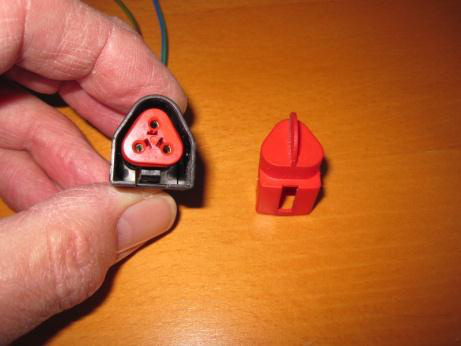
On the later plug the additional connector is left fitted on the STAR tester. The black connector is diagnostics. The red cap is removed by pressing the clip on the bottom of the connector, at the back. The white connector is the octane adjust.
Earlier cars, type 2
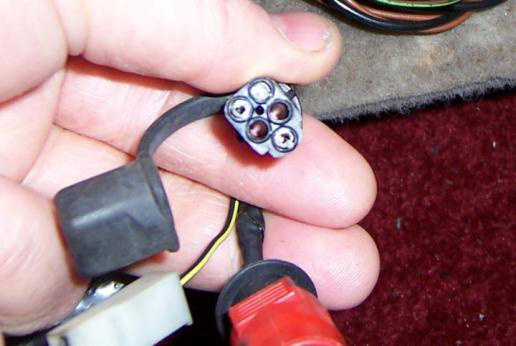
On the earlier plug the additional connector has to be taken off the STAR tester or the car’s plug will not mate. Diagnostics is the connector under the black cover. The red cover is the octane adjust.
What the display does with a code
After MEM/TEST, the TEST symbol means the reader is ready. The module then sends a series of codes. Any codes it gives are repeated once. If there is only one code, or there is no fault, that code stays on the display and the LED flashes to show the repeat. Write the codes down as they appear. They are the faults present during that pass. Code 11 is a pass. If the car still misbehaves after an 11, the notes say to carry out the fuel checks.
Leave the tester connected between the engine-off pass and the continuous-code pass, and again between the continuous pass and the engine-running pass. It is switched off between passes, which clears the memory, so the written list is the record. The tester comes off only at the end of the engine-running pass, and the octane-adjust and idle-adjust wires go back on then if they were removed.
Engine-off self-test
This pass checks sensors and actuators in the rest position. It then opens a wiggle test so a wiring or connector fault can be made to show itself. Do not crank the engine.
- Disconnect the octane-adjust wire and the idle-adjust wire if either is grounded. Switch the air conditioning off. Select neutral and make sure the handbrake is fully applied.
- Connect the STAR tester to the three-pin self-test socket. Switch the tester on with the ON/OFF button. Confirm that the low-battery warning is not displayed. Press the 2-digit button, press Slow, then press MEM/TEST. The TEST symbol means the reader will accept codes from the module.
- Switch the ignition on and do not crank. After a short pause, while the module is powering up, it enters the self-test.
- Watch the display and write down every code. The module looks for normal engine-off sensor readings and for the state of the input switches. Any value outside limits is logged, and the module then emits the series. Code 11 here means no fault was found in this pass. Any other code is a fault present now.
- Code 10 comes up next. That is the command to start the wiggle test: the module is in wiggle mode. Move the wiring and the connectors while watching the LED. A flash is a fault. Note where the harness was when the LED flashed.
- Switch the ignition off. Press MEM/TEST. Switch the tester off, but leave it connected.
- Correct every code from the code list and every wiring fault found while wiggling. When the repair is done, run the whole self-test again from the engine-off pass. Only move on to the continuous-code test once this pass is clean.
Continuous-code self-test
This pass checks for normal running values. The engine is started before the reader is put into test.
- Start the engine. Switch the tester on and confirm there is no low-battery warning. Press the 2-digit button, press Slow, wait about four seconds, then press MEM/TEST. The TEST symbol means the reader is ready.
- Write down every code. The module looks at the sensor readings and at the state of the input switches. A value outside limits is logged and then emitted. The same display rule applies: a series is repeated once; a single code stays up and the LED flashes while it is repeated. Code 11 means this pass found no fault. Any other code is a fault present during this running check.
- Press MEM/TEST. Switch the tester off. Switch the ignition off. Leave the tester connected.
- Correct the codes from the code list, then repeat the whole self-test. The notes’ closing line for this section still says “proceed to the continuous self-test” and refers to codes recorded in steps 4 or 5. That wording is the engine-off close, and this section does not have those steps. The order given at the start is engine-off, then continuous codes, then the engine-running test, so the running test is next once the continuous pass is clean.
Engine-running self-test
The module uses this pass for dynamic checks. It will refuse those checks if the coolant is cold, the transmission is not in neutral, or the air conditioning is on. Those conditions are reported as codes before the engine speed is raised, and the dynamic sequence does not start.
- Switch the tester on. Confirm there is no low-battery warning. Press the 2-digit button, press Slow, wait about four seconds, then press MEM/TEST. Wait for the TEST symbol.
- Switch the ignition on, wait three seconds, and then start the engine. The pause is there so the module has initialised before the engine is cranked.
- Code 50 should be displayed. Code 50 confirms a European-specification module. No action is required for 50 itself.
- A series of codes may appear at this point. They mean the module has seen coolant that is not hot enough, a transmission that is not in neutral, or air conditioning that is still on. If any code appears here, the module will not go on to the dynamic checks. Switch the tester off, press MEM/TEST, switch the engine off, correct the cause, and repeat the whole engine-running test.
- Engine speed then rises on its own. The module has entered the dynamic sequence. It checks switches and inputs against the engine-running limits, and it checks the actuators it controls by simulating conditions and comparing each actuator’s response with the programmed parameters. Faults are logged in the module and are displayed later; they are not shown during the speed increase.
- Code 10 is the command to blip the throttle. Do it as soon as 10 appears. The module has to see engine speed go above 3,000 rpm.
- Code 44 may appear. It means the module did not see a large enough change in engine speed, so the blip was missed or was not hard enough. Press MEM/TEST, switch off the tester and the engine, go back to step 1, and repeat the whole engine-running test. If 44 does not appear, continue.
- Code 11 or the fault codes then appear. These are faults that occurred at any time during this procedure, including the dynamic checks.
- If there are fault codes, press MEM/TEST, switch the tester off, correct them from the code list, and repeat the whole engine-running test. If there is no fault, 11 stays displayed and the test continues.
- Code 60 should then be displayed. The module has locked ignition timing and locked the idle-speed control valve at preset values. It will not compensate timing or idle. Basic ignition timing has to be set in this mode. If the throttle has to be held slightly open to check or adjust the timing, the notes say to use a feeler gauge. Code 60 is only held for about ten minutes, so that the locked setting cannot be left on long enough to damage the engine. If code 70 appears before the timing has been set, 70 means the module has unlocked the code-60 state. Continue to the shutdown step, then repeat the whole engine-running test to obtain 60 again and set the timing inside that window.
- Switch the engine off. Press MEM/TEST. Switch the tester off and disconnect it. Reconnect the octane-adjust wire, the idle-adjust wire, or both, if they were disconnected at the start.
Service codes
The same component can raise as many as three different codes. Those codes carry a more specific failure mode, and the notes say that detail exists to validate the system during manufacture. In service, the repair for two different codes on the same component can be the same job. Coolant-temperature codes 23 and 33 are the example given: both point at the coolant-temperature sensor, and both are sent to the same pinpoint. Vane-air-meter No. 1 codes are 12, 22, 32 and 41. Vane-air-meter No. 2 codes are 16, 26, 36 and 42. The notes do not define what separates No. 1 from No. 2, apart from the special case for code 16 below, so the two groups stay separate here.
Where the action is a workshop page number, that pinpoint is not in these notes. The page number is the cross-reference the notes recorded. Several entries were left as a blank page number; those are marked as not recorded. Codes that do not appear in the list were not given.
| Code | What it indicates | Action |
|---|---|---|
| 10 | Command code | Wiggle test during the engine-off pass, or blip the throttle during the engine-running pass. It is an instruction, not a failed part. |
| 11 | System pass | No fault in the pass that has just run. If a fault is still present on the vehicle, carry out the fuel checks. |
| 12 | Vane air meter No. 1 | Workshop pinpoint, page 14. |
| 13 | Engine coolant temperature sensor | Workshop pinpoint, page 15. |
| 14 | Vane air temperature sensor | Workshop pinpoint, page 19. |
| 15 | Throttle position sensor | Workshop pinpoint, page 16. |
| 16 | Vane air meter No. 2 | If 16 is the only code in the engine-running self-test, check base idle speed using the procedure on workshop page 28. If any other code is present as well, use workshop page 17. |
| 18 | Battery voltage low | Check the charging system and the battery. If both are sound, fit a new EEC-IV module. |
| 21 | Ignition signal erratic | Workshop pinpoint, page 18. |
| 22 | Vane air meter No. 1 | Workshop pinpoint, page 19. |
| 23 | Engine coolant temperature sensor | Workshop pinpoint, page 21. In service this can be the same repair as code 33. |
| 24 | Vane air temperature sensor | Workshop pinpoint, page 19. |
| 25 | Throttle position sensor | Workshop pinpoint, page 22. |
| 26 | Vane air meter No. 2 | Workshop pinpoint, page 17. |
| 31 | ROM/RAM failure | Breakout-box checks. The notes leave the workshop page number blank. |
| 32 | Vane air meter No. 1 | Workshop pinpoint, page 19. |
| 33 | Engine coolant temperature sensor | Workshop pinpoint, page 21. In service this can be the same repair as code 23. |
| 34 | Vane air temperature sensor | Workshop pinpoint, page 19. |
| 35 | Throttle position sensor | Workshop pinpoint, page 22. |
| 36 | Vane air meter No. 2 | Workshop pinpoint, page 17. |
| 41 | Vane air meter No. 1 | Workshop pinpoint, page 14. |
| 42 | Vane air meter No. 2 | Workshop pinpoint, page 17. |
| 43 | Throttle position sensor | Workshop pinpoint, page 22. |
| 44 | Blip test not performed | The throttle blip did not raise engine speed enough. Repeat the self-test. |
| 45 | Vehicle speed sensor | Breakout-box test 35. |
| 46 | Idle speed control valve failure | Workshop pinpoint, page 33. |
| 47 | Low idle speed during the test | Workshop pinpoint, page 33, and the fuel checks. The notes leave the fuel-check page number blank. |
| 50 | European module fitted | No action. This is the confirmation, during the engine-running test, that the module is the European specification. |
| 51 | Air conditioning on | Switch the air conditioning off and repeat the self-test. The dynamic checks will not start while it is on. |
| 52 | Vehicle in drive during the test | Select neutral or park and repeat the self-test. |
| 53 | Octane adjust grounded | Disconnect the adjustment wire and repeat the self-test. Check the wiring. The notes leave the wiring page number blank. |
| 54 | Octane adjust grounded | Disconnect the adjustment wire and repeat the self-test. Check the wiring. The notes leave the wiring page number blank. Recorded separately from 53, with the same action. |
| 55 | Idle speed adjust grounded | Disconnect the adjustment wire and repeat the self-test. Check the wiring. The notes leave the wiring page number blank. |
| 57 | Throttle moved during the test | Repeat the self-test. The throttle has to stay still except for the deliberate blip when code 10 is displayed. |
| 60 | Service set mode | Check and adjust ignition timing. Timing and the idle-speed control valve are locked to preset values, with no compensation, for about ten minutes. |
| 67 | Fuel-rail temperature switch | Workshop pinpoint, page 24. |
| 70 | Out of service set | The module has left code 60 and unlocked timing and idle control. The notes give no separate repair for 70. If it appears before timing has been set, shut down and repeat the engine-running test to obtain 60 again. |
Code 10, code 11, code 44, code 50, code 51, code 52, code 57, code 60 and code 70 are read in the sequence above. They are part of running the test, not a reason to replace a sensor on their own. A component code still needs the pinpoint the table names; these notes stop at the code and the cross-reference.