Connector pinout
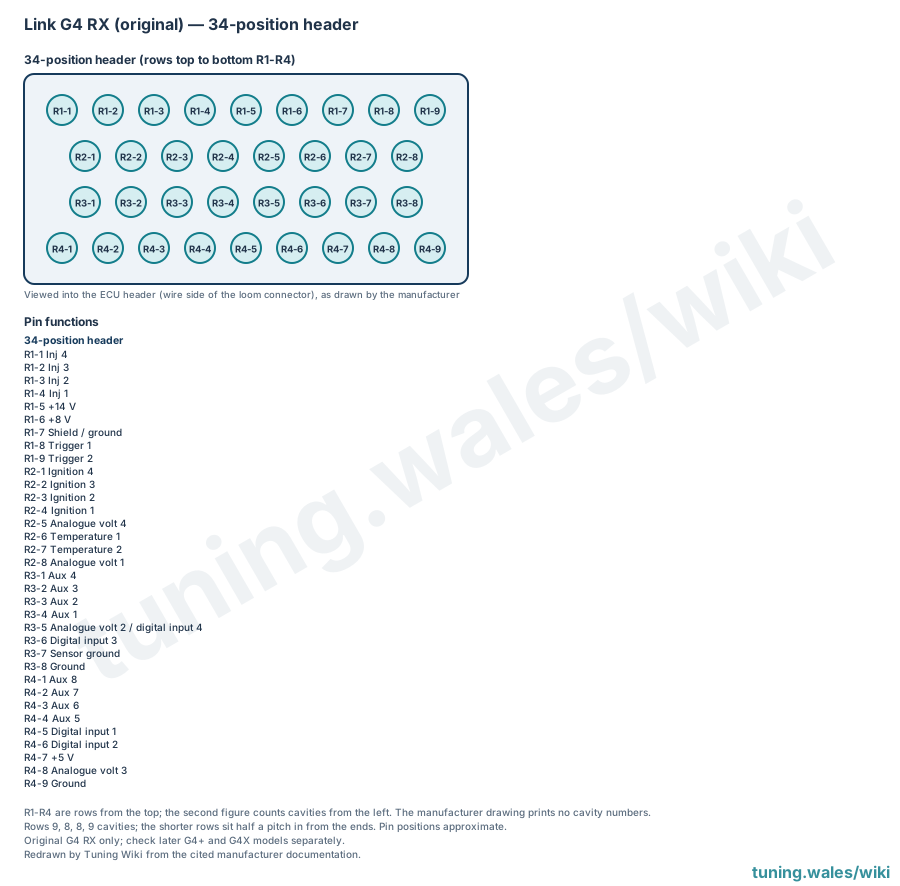
The original (pre-G4+) Link G4 RX has a single 34-position header arranged in four rows of 9, 8, 8 and 9 cavities, with the two shorter middle rows set half a cavity in from the ends. Link's 2010 G4 wiring and installation manual (manufacturer documentation) gives a function and loom colour for every position. It draws the header viewed into the ECU, which is the wire side of the loom connector, but prints no cavity numbers. Positions are therefore named here by row from the top (R1 to R4) and by count from the left, and each pin note also gives the position's place in reading order (1 to 34, left to right and top to bottom). None of these are manufacturer cavity numbers.
The header carries four injector drives, four ignition outputs, two trigger inputs, eight auxiliary outputs, three dedicated digital inputs, two temperature inputs and four analogue voltage inputs. One position (R3-5) can be used either as analogue voltage 2 or as digital input 4. Power and reference connections are +14 V, +8 V, +5 V, two grounds, a sensor ground and a shield/ground. The pin index gives each position's loom colour.
The layout applies to the original G4 RX only. Later G4+ and G4X models must be checked separately, and the actual unit and loom should be confirmed before wiring.
Sources
- G4 wiring and installation manual. Link Electrosystems, manufacturer installation manual, 2010; RX header drawing on page 17. Accessed 19 November 2026.
Connector pinout
Link G4 RX, original (pre-G4+) generation. Functions and loom colours from Link's G4 wiring and installation manual (2010), page 17, which shows the 34-position header viewed into the ECU (wire side of the loom connector) without cavity numbers. Positions are named by row from the top (R1-R4) and by count from the left; each pin note also gives its position in reading order (left to right, top to bottom). None of these are manufacturer cavity numbers. Does not apply to later G4+ or G4X models.
View orientation is stated beside each photograph. Unknown functions remain in the pin index.
34-position main header
View: Viewed into the ECU header (wire side of the loom connector), as drawn by the manufacturer
Select a pin in a photograph or the index to highlight it.
| Pin | Function / cavity | Confidence / source | Notes |
|---|---|---|---|
| Inj 4 Cavity: Populated |
Confirmed Link G4 installation manual (2010), p. 17 |
Loom colour Brown/orange. Position 1 in reading order. | |
| Inj 3 Cavity: Populated |
Confirmed Link G4 installation manual (2010), p. 17 |
Loom colour Brown/red. Position 2 in reading order. | |
| Inj 2 Cavity: Populated |
Confirmed Link G4 installation manual (2010), p. 17 |
Loom colour Brown. Position 3 in reading order. | |
| Inj 1 Cavity: Populated |
Confirmed Link G4 installation manual (2010), p. 17 |
Loom colour Brown/black. Position 4 in reading order. | |
| +14 V Cavity: Populated |
Confirmed Link G4 installation manual (2010), p. 17 |
Loom colour Red. Position 5 in reading order. | |
| +8 V Cavity: Populated |
Confirmed Link G4 installation manual (2010), p. 17 |
Loom colour Red/white. Position 6 in reading order. | |
| Shield / ground Cavity: Populated |
Confirmed Link G4 installation manual (2010), p. 17 |
Loom colour Green. Position 7 in reading order. | |
| Trigger 1 Cavity: Populated |
Confirmed Link G4 installation manual (2010), p. 17 |
Loom colour Black. Position 8 in reading order. | |
| Trigger 2 Cavity: Populated |
Confirmed Link G4 installation manual (2010), p. 17 |
Loom colour Red. Position 9 in reading order. | |
| Ignition 4 Cavity: Populated |
Confirmed Link G4 installation manual (2010), p. 17 |
Loom colour Blue/orange. Position 10 in reading order. | |
| Ignition 3 Cavity: Populated |
Confirmed Link G4 installation manual (2010), p. 17 |
Loom colour Blue/red. Position 11 in reading order. | |
| Ignition 2 Cavity: Populated |
Confirmed Link G4 installation manual (2010), p. 17 |
Loom colour Blue/brown. Position 12 in reading order. | |
| Ignition 1 Cavity: Populated |
Confirmed Link G4 installation manual (2010), p. 17 |
Loom colour Blue. Position 13 in reading order. | |
| Analogue volt 4 Cavity: Populated |
Confirmed Link G4 installation manual (2010), p. 17 |
Loom colour White/black. Position 14 in reading order. | |
| Temperature 1 Cavity: Populated |
Confirmed Link G4 installation manual (2010), p. 17 |
Loom colour Yellow. Position 15 in reading order. | |
| Temperature 2 Cavity: Populated |
Confirmed Link G4 installation manual (2010), p. 17 |
Loom colour Yellow/brown. Position 16 in reading order. | |
| Analogue volt 1 Cavity: Populated |
Confirmed Link G4 installation manual (2010), p. 17 |
Loom colour Yellow/blue. Position 17 in reading order. | |
| Aux 4 Cavity: Populated |
Confirmed Link G4 installation manual (2010), p. 17 |
Loom colour Orange. Position 18 in reading order. | |
| Aux 3 Cavity: Populated |
Confirmed Link G4 installation manual (2010), p. 17 |
Loom colour Orange/red. Position 19 in reading order. | |
| Aux 2 Cavity: Populated |
Confirmed Link G4 installation manual (2010), p. 17 |
Loom colour Orange/brown. Position 20 in reading order. | |
| Aux 1 Cavity: Populated |
Confirmed Link G4 installation manual (2010), p. 17 |
Loom colour Orange/black. Position 21 in reading order. | |
| Analogue volt 2 / digital input 4 Cavity: Populated |
Confirmed Link G4 installation manual (2010), p. 17 |
Loom colour White/brown. Position 22 in reading order. | |
| Digital input 3 Cavity: Populated |
Confirmed Link G4 installation manual (2010), p. 17 |
Loom colour Grey/red. Position 23 in reading order. | |
| Sensor ground Cavity: Populated |
Confirmed Link G4 installation manual (2010), p. 17 |
Loom colour Green. Position 24 in reading order. | |
| Ground Cavity: Populated |
Confirmed Link G4 installation manual (2010), p. 17 |
Loom colour Black. Position 25 in reading order. | |
| Aux 8 Cavity: Populated |
Confirmed Link G4 installation manual (2010), p. 17 |
Loom colour Orange/purple. Position 26 in reading order. | |
| Aux 7 Cavity: Populated |
Confirmed Link G4 installation manual (2010), p. 17 |
Loom colour Orange/blue. Position 27 in reading order. | |
| Aux 6 Cavity: Populated |
Confirmed Link G4 installation manual (2010), p. 17 |
Loom colour Orange/green. Position 28 in reading order. | |
| Aux 5 Cavity: Populated |
Confirmed Link G4 installation manual (2010), p. 17 |
Loom colour Orange/yellow. Position 29 in reading order. | |
| Digital input 1 Cavity: Populated |
Confirmed Link G4 installation manual (2010), p. 17 |
Loom colour Grey/black. Position 30 in reading order. | |
| Digital input 2 Cavity: Populated |
Confirmed Link G4 installation manual (2010), p. 17 |
Loom colour Grey/brown. Position 31 in reading order. | |
| +5 V Cavity: Populated |
Confirmed Link G4 installation manual (2010), p. 17 |
Loom colour Red/blue. Position 32 in reading order. | |
| Analogue volt 3 Cavity: Populated |
Confirmed Link G4 installation manual (2010), p. 17 |
Loom colour Yellow/black. Position 33 in reading order. | |
| Ground Cavity: Populated |
Confirmed Link G4 installation manual (2010), p. 17 |
Loom colour Black. Position 34 in reading order. |